N-Loop Perfect Celtic Knot Seeks Perfect Sphere
by Alan Stratton on Thursday, June 25th, 2015 | 2 Comments
May also be viewed on YouTube.
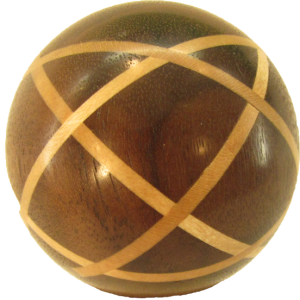 This journey thru Celtic knots has resulted in an easy and repeatable process that greatly simplifies preparation of the turning stock. In previous descriptions, the project wood had to be milled to exact dimensions: squares for four loops being the easiest, triangles for three loop, pentagons for five loops.
The significant realization was that it’s not the wood that has to be milled. The milled wood was shaped to provide positioning for the cutting angles. Instead, we only need to make plywood polygons that can be attached to the ends of the wood to maintain positions.
To summarize how to make a n-loop Celtic knot:
- Prepare appropriate stock for the project. The only requirement is that the two opposite end be parallel and their centers drilled to a shallow depth.
- Prepare paper templates with polygons with sides equal to the number of loops desired in the Celtic knot: triangle for three loops; square for four loops; pentagon for five loops and so on.After the previous video with a Celtic knot in a barbecue flipper, several comments included a suggestion to leave a little wood when the angle cut is made to keep the wood spaced correctly. In addition Michael challenged me to make a 3 loop Celtic knot. The project wood must fit inside and be centered on the center of the polygon.
- Glue the templates to plywood, rough cut, and sand down to the perimeter line.
- Temporarily glue the plywood polygons to the ends of the project wood. Use a small nail thru the plywoods’ center and into the center of the project wood.
- Choose a cut angle for the knot.
- Prepare the saw with appropriate stops and supports. Do NOT change any stop or support until the project is completed to reduce the opportunity for error.
- Set the depth of cut to allow a thin piece of wood to remain connecting the otherwise two pieces of wood. Use scrap wood temporarily glued to the project wood to supplement and reinfore the cut area before making the cut.
- Make the cut.
- Prepare contrasting spline material to easily slide into the saw kerf.
- Glue spline into the saw kerf. Work quickly to insert and position the spline before the glue sets. Do not use CA glue.
- Clean up excess spline material and the scrap reinforcements.
- Repeat steps 8,10, & 11 for each additional knot loop.
- Finish turn the project. Hurrah.
How to make a perfect sphere or ball.
- Prepare a faceplate with a cup that fits the rough ball. Find a rubber stopper about twice as large as your threaded(hopefully) live center. Drill to fit the live center.
- Measure the diameter of the spindle. Mark that length on the spindle, centering as necessary.
- Partially part outside these marks to indicate the top and bottom. Rough turn the ball between centers. Make a pencil line at the equator (largest center) of the ball.
- Saw off the small tenons.
- Rotate the rough ball 90 degrees and mount to the cup faceplate, holding it with the rubber stopper on the live center. The equator line should now run parallel to the turning axis.
- Use a scraper or other gentle tool to carefully remove any wood higher than the equator line but be sure to leave the line.
- Mark a new equator line.
- Rotate the ball 90 degrees so the new equator line is parallel to the turning axis.
- Use a scraper or other gentle tool to carefully remove any wood higher than the equator line but be sure to leave the line.
- If satisfied, move on to sanding. Otherwise, repeat steps 7, 8, and 9 until you are.
- For each sanding grit repeat the same ball rotations used to turn the ball but don’t mark equator lines. Do the same process by eye. That will be good enough for sanding.
Good turning.
Hi Alan,
Loved the celtic knot ball. It looks a real challenge.
I like your presentation style, (though would enjoy the option to watch a normal speed video once had a taster at fast forward rate).
And thanks for showing the challenge you had with the glue-up. It’s nice to see a very experienced craftsman showing it ain’t all plain sailing!
Thanks for sharing your work.
Greg
You’re welcome.
I’m studying a way to provide longer but don’t have a conclusion yet.
Thanks for watching and commenting.
Alan