Celtic Knot Dresses Up Pizza Cutter Handle
 May also be viewed on YouTube, Vimeo, and Facebook – But best right here!
Remember – this year’s Christmas Ornament Challenge is rapidly approaching – November is almost here.
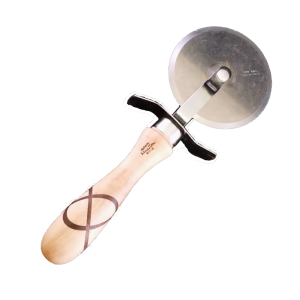
My wife asked me to turn a new handle for her pizza cutter. The original handle had almost disintegrated.
A handle is a fairly simple spindle project. But I decided to dress it up a little bit. After all, according to my children, pizza is the foundation of all food groups. One can live and thrive on pizza.
This handle is maple with walnut accents. it is about 6 inches long and about 1 inch in diameter. The maple is an example of urban forestry – it came from a tree downed in a storm three years earlier. At that time, it was rough turned and set aside.
The Celtic knot makes a huge difference is how it looks. I choose a three loop knot. Most people recommend milling stock perfectly square to prepare for a Celtic knot. They also always get a four loop knot.
In my opinion, a knot is not restricted to four loops. It can have as many loops as can esthically fit in the wood. The difference is the process.
But first, a table saw sled also helps. For this video, I made my sled from scrap particle board, a scrap 1×4, and a scrap 2×2. To upgrade the sled, use as thin a piece of plywood as can be obtained with a size appropriate for the planned knots. Don’t worry too much about the size. The cost is so trivial, the sled can be re-made if necessary. Then a board is attached perpendicular to the cut line at the top and the bottom. These boards must be taller than the maximum sawing depth. They hold the right and left parts of the sled together after the initial saw cut. My sled rides against the rip fence. To upgrade, add a miter gauge track.
The Celtic knot process is:
- Rough turn the timber to a diameter slightly greater than the finished diameter to allow for nicks, defects, and axis deviations.
- Prepare two identical paper polygons:
a. Draw a circle with diameter equal to the timber diameter.
b. Draw a polygon with sides tangent to the circle. The number of sides is the number of loops wanted in the Celtic knot.
c. Draw a center indicator to both the circle and the polygon (same spot) - Glue the paper polygons to a scrap piece of hardboard or plywood. Then rough cutout the polygons staying outside the lines of the polygon.
- Sand the edges of the polygon to split the edge line on a sander. These are now the Celtic knot templates.
- Fasten the templates to the ends of the roughed timber cylinder. Adjust the templates to align with each other. Add a little hot melt glue to ensure the templates will not turn on the timber. On one template, number the verticies in the order they will be sawn. Most often this will be in sequential order.
- On the sled, determine the angle for the slices of the Celtic knot. Many will chose 45 degrees but feel free to experiment with greater or lesser angles. With hot melt glue, glue a scrap wood strip longer than the workpiece at the desired angle. Glue another short piece as a stop. Using these two boards, you will be able to reposition the work piece exactly for each cut. Adjust the saw depth of cut to cut thru the work piece but not any deeper. Actually, the cut does not have to be completely thru the piece as long as it is deep enough for the entire finished slice. Count on full depth.
- From the markings on the template, determine the bottom or cut side. Using hot melt glue, add a thin scrap piece of wood to the top of the workpiece. This keeps the opposite ends of the workpiece in their original position after the cut.
- Place the workpiece on the sled and saw a slot thru the workpiece but not the scrap wood on the top.
- Glue in the contrasting wood in the slot. The wood must easily but not slopily fit. Use a glue with a long set time such as TiteBond Original Extend.
- After the glue dries, remove the top scrap wood and trim the contrasting wood. Careful work on a bandsaw does the trick.
- Repeat Steps 8 thru 10 for each loop. Leave the project alone at least overnight or longer to allow the glue to dry and moisture content to stabilize.
- When dry, turn the final profile on the workpiece. The Celtic knot will reveal itself shortly.
That’s one item checked off the honey do list. 🙂
Previous Celtic Knot videos:
- Woodturning Celtic Knot On Pigtail Barbecue Tool Handle
- Knotted Back Muscles – Back Pain Relief With Celtic Knot
- N-Loop Perfect Celtic Knot Seeks Perfect Sphere
Good turning.