Woodturning Walnut Box with Eccentric Lid
by Alan Stratton on Thursday, October 26th, 2017 | Comments Off on Woodturning Walnut Box with Eccentric Lid
 This video may also be viewed on YouTube, Vimeo, Or Facebook – But why not right here?
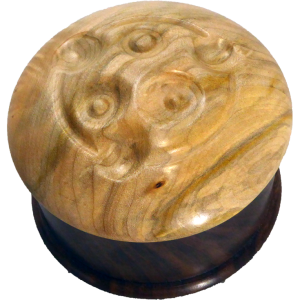
Here’s another way to dress up a turned cross grain wood box with a lid. Use the Infinite Axis Chuck to decorate a lid in a way that will never be duplicated.
Here’s what I did.
First, I turned the lower box portion. This is a common procedure:
- Round off the wood blank.
- Cut a mortise for an expansion mount to a scroll chuck. With an expansion mount, the box wall height is not sacrificed. This side will become the interior of the box.
- Reverse the mount and turn the exterior profile of the box including an expansion mortise in the box bottom.
- Again, reverse the mount with the chuck in an expansion mode. Hollow the interior and refine the exterior.
- Sand and finish.
Then form a lid. This similar to a bowl process:
- Round off the wood blank.
- Cut a tenon and rough shape the exterior.
- Reverse the lid and shape the interior. The first part of the interior shaping is to match the lid to the box portion. As part of the interior, form an expansion mortise to be used next. This mortise should also provide a flat bottom to match the work platform for the Infinite Axis Chuck.
- Sand and finish the interior.
- Reverse the lid and refine the exterior.
- Sand but do not finish the exterior.
To add decoration feature to the lid, use the Infinite Axis Chuck.
- Use hot melt glue (or double stick tape) to mount the lid to the work platform for the Infinite Axis Chuck.
- Position the chuck for the first feature. The live center provide a great guide to the new center.
- Cut and sand the feature.
- Repeat for all desired features.
- Do any final sanding and apply finish.
My box is 4 inches in diameter and 3 inches tall finished with lacquer. The base is walnut; the lid is poplar.
Remember the Christmas Ornament Challenge submission period is November. Time to get turning.