A Butternut Squash Recipe With A Special “Turn”
by Alan Stratton on Friday, November 22nd, 2013 | 8 Comments
 I have a very different recipe for butternut squash.
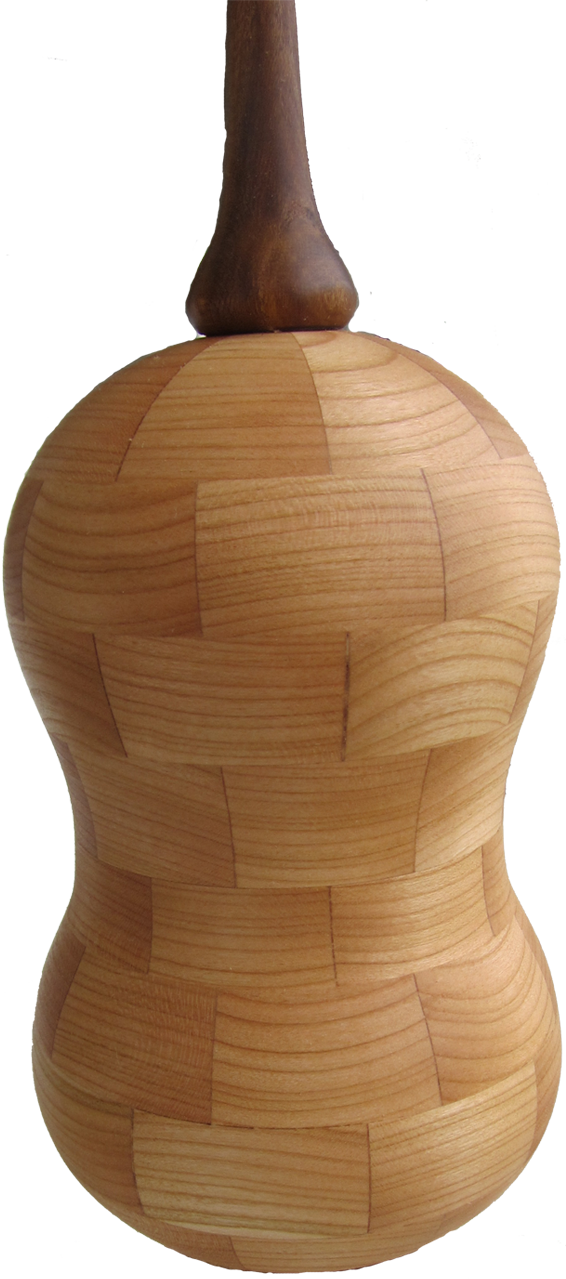
- Select a favorite wood in dimensional lumber form. (I used cherry)
- Decide the maximum diameter for your squash. (Mine is 4 inches)
- Calculate a segment length as Length = Diameter x pi / segments. (4 x 3.14159 / 8 = 1.57)
- Saw segments to length determined in step 3 with 22.5 degree angles. These will be trapezoids. The long side is the length you calculated.
- Glue pairs of segments together; clamp for 5-10 minutes and let cure for at least 1 hour.
- Glue these pairs into half rings using an band clamp. Insert small dowels between the halves before tightening the clamp. Let cure.
- Sand the side of each half ring until each half fits nicely against each other forming a full ring.
- Glue these half rings into full rings with the band clamp.
- Sand at least one face flat and smooth.
- Take 2 threaded wood faceplates made from your favorite cheap wood. Using hot melt glue center then glue one full ring on each.
- If desired, plug any center hole in the first layer.
- On the lathe, face off the first ring so the two faces are parallel and smooth. Lightly sand as necessary.
- Center and glue with wood glue the next ring.
- Repeat steps 12 and 13 for each ring on each faceplate until as tall as desired for your squash.
- Mount one glued stack on the lathe. This will be your top.
- Roughly shape exterior to taste.
- Cut a mortise with parallel sides from 1/2 to 3/4 inches deep inside the top portion.
- Hollow, sand, and finish the interior.
- Mount the other glued stack. This will be your bottom.
- Roughly shape exterior to taste.
- Cut a tenon that matches the mortise you cut on the top. Use extra care to acheive the taste(fit) you desire.
- Remove the faceplate from the top stack and mount this stack on the bottom stack.
- Bring up the tailstock and shape the exterior to taste, making sure you don’t break into the interior.
- Sand and finish the top exterior. Remove the top from the lathe.
- Hollow, sand, and finish the bottom interior.
- Reverse mount the bottom. I prefer a jam chuck. Strawberry is my favorite flavor of jam.
- Finish shaping, sand, and finish the exterior.
- Decorate the top with a stem of your choosing.
- Fill with chocolate candies and enjoy whenever the craving hits you.
A food safe finish is required.
Alan,
What a neat project! I’m adding it to my list of must-do’s. just want you to know how much I look forward to Saturday morning email to see what direction you are going in each week. Thank you!
You’re so welcome. What projects would you like to see?
Alan
I’m enjoying playing with turning green wood, but having mixed results with cracking and shrinking. I’d love to see a few more of these projects that show how you anticipate, and deal with drying issues.
ok, I have a chunk of gum from a tree that fell next to my house.
Alan Stratton
Really cool. (The capacity of the “squash” isn’t nearly enough to begin to satisfy my appetite for the chocolate…..)
The chocolate may only be an appetizer for you
Alan
What a fun project. Butternut squash is my favorite. Stuffing it could be a whole new game, too! Did you consider making it taller? The box could be more useful if dimensions were allowed to grow a little. What complications did you foresee?
thanks, I really appreciate your creativity.
Daniel
Actually, I made it the same size an a (very) small squash from our garden. Bigger is not a problem – It would add some complication for a deeper interior. But being built up from segmented rings, there are many options to hollow as it is built.
Thanks for your question and comment.
Alan Stratton