Home Made Vaporizer for “Pyrography”/Woodburning
May also be viewed on YouTube – but better here!
There’s still time to enter this year’s Christmas Ornament Woodturning Challenge. Follow this link for details and and this separate link for this year’s challenge playlist for all ornament video submissions.
We appreciate all skill levels and all types of Christmas ornaments.
 As promised, this is my build video for my DIY or home made power supply to use for pyrography or woodburning on my woodturning projects. Graeme Priddle is the source for this design that he called a “Vaporizer”.
This vaporizer uses a battery charger modified to remove much of the internal circuitry with the addition of a household dimmer switch.
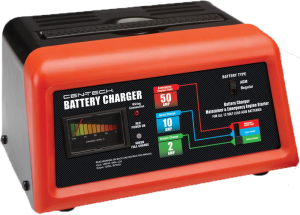
- 1- Harbor Freight – 10/2/50 Amp 12V Manual Charger With Engine Start ~$39.99 – watch for a sale and/or coupon.
- 1- Ace Hardware – Lutron Push On/Off Dimmer (D-600PH-3K) ~$9.49
- 2- ¼” Female Panel Mount Jacks
In Graeme Priddle’s notes, he often uses a NAPA battery charger. I don’t believe this matters as long as you can figure out the internal wiring that needs to be removed. He also hard wires his pyrography pen to avoid any power loss from the connection. However, I chose to mount two 1/4″ sockets in the front panel to enable two pens to be plugged in at once. However, only one can be used at a time. I used a switch from the battery charger to control which switch is powered.
The most difficult part was routing power to the switch and to the power sockets. Had I used a single in-line connection, the work would have been much simpler.
At the input to the battery charger, I removed a circuit board and wired the dimmer switch into the black or power input wire. I had to use additional wire to make the connections since there was just not enough extra wire.
On the output side, I traced back the wires leading out to the battery clamps. I was able to remove a couple more pc boards that otherwise control current.
After removing these components, I soldered a wire leading from the front meter to the center connector of the switch that originally controlled amperage. Then I soldered wires from the two poles of the switch to the power socket terminals.
I cut these wires from the output cable running to the battery clamps. This wire is heavier and should handle the power adequately.
Another couple of wires from the other connectors on the power sockets and connected to a wire that originaly lead to a component.
For operation, power is controlled by the push on/push off operation of the dimmer switch then by rotating the dimmer clockwise to increase power. It’s best to start with the dimmer rotated completely to the left.
The front switch controls which power socket will receive power. Two pens can be plugged in but only one will receive power.
This power supply has ample power to drive a large pen tip and to quickly reheat a tip after a touch to burn wood.
Please remember to unplug when not in use. Rotate the dimmer counter-clockwise before powering up. Let tips cool before touching. Whoever uses and modifies a commercial unit to adapt its use has to take full responsibilities for maintenance, safety and proper operation.
That said, this is a great project, very economical, to create a variety of effects applied to woodturning projects.
In another video, I’ll show how to make a pen to use with this power supply. Don’t worry, the pen is easier than the power supply.
Good turning.
I briefly seen your video on YouTube I went out and purchased all of your materials on your materials list. When I got down to working on the machine I found your video to be absolutely worthless. Not only could I not follow it but it was not even the same machine that you had listed for me to purchase. You did not ever show what wires went where you shown a fast forwarded version of you messing round with the interior workings of the battery charger. I am not electrician nor was out of the impression that you needed to be one to complete this project I just wanted to thank you for wasting money that I don’t have an time you don’t deserve. On your next YouTube video why don’t you try slowing down showing what you’re doing instead of listening to yourself talk. And this is not something that I can just plug in play and figure out myself somebody could die so if you happen to get a chance do you think you can send me a schematic of the battery charger please.
The vaporizer was a difficult project for me also. As noted in the video, I had the help of others in my club to advise me what to cut out.
Admittedly also, with all the fiddling inside, the video was not that clear. To offset that, there is a schematic at about 1:29 in the video.
In the end, you are inserting your dimmer switch in place of most everything before the transformer. After the transformer, you have the power to your pen. You could simplify the output side by hard wiring your pen. Mine was more complicated because I inserted 2 plug ins instead of hardwiring. Graeme Priddle only hard wired – I like the flexibility of the plug ins.
I apologize for your frustration with this more difficult project especially for we who are not electricians. However, for your consideration, my mother always said you catch more flies with honey than vinegar.
Alan
i just recently found your website and subscribed i have wanted to incorporate burning the wood on my turnings and watched your video on building the vaporizer, like James I was confused a bit but if you think about what your doing it becomes clearer,first you control the power in the 110 not the power out then i will hard wire the pen nobody even James should have two HOT pens to burn himself with no need of bells and whistles just down and dirty, after all the alternative is Burnmasters $200 power supply.Kudos to a great website ive been making shaveings for a number of years and enjoy new approaches to our art. Michael
Thank you Michael.
Given that any pen will immediately achieve full temperature with this power, I also don’t see the need to have two connected at once.
Keep on turning.
Alan