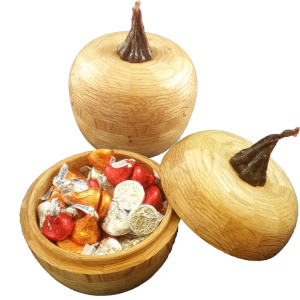
Adding A ‘Natural’ Stem To Segmented Pumpkin Treat Box
by Alan Stratton on Friday, November 11th, 2016 | Comments Off on Adding A ‘Natural’ Stem To Segmented Pumpkin Treat Box
This video may also be viewed on YouTube, Vimeo, and Facebook. But best right here.
This video is part 2 of a 2 part series. In part 1, I created a turned segmented pumpkin box to hold special treats during the Thanksgiving season.
This video for part 2 concerns the ‘natural stem’ for this pumpkin. For the stem I and my son:
- Selected two small pumpkins with interesting stems;
- Spray varnished (rattle can) the stems;
- Cut the bottom out of two plastic cups;
- Used Sculpey clay to form a seal between the top of the pumpkin and rim of the cup;
- Approximated the volume of Part A of silicon rubber compound and weighed it on a digital scale;
- Reset the scale and added 10% by weight of part B ofthe silicon rubber;
- Thoroughly mixed the rubber,
- If we would have had vacuum equipment, we would have pulled a vacuum to draw out air bubbles;
- Poured the liquid rubber into the cups and let harden;
- Apologized to the pumpkin for its hardship;
- Removed the hard rubber from the pumpkin;
- Using 2 part expoxy, measured the epoxy into two separate cups;
- Mixed sawdust into each cup of epoxy;
- Subjected each cup to a vacuum to remove bubbles;
- Mixed the two cups of epoxy together and again subjected it to a vacuum;
- Poured the mix into the molds and let harden.
- Cleaned up the excess epoxy and drilled for a tenon;
- Glued in a tenon
- Mounted stem to the pumpkin lid.
All in all, the process was not very difficult and my molds can be used over again.
My epoxy was old 2 part counter top finish. It was a challenge to have harden probably due to age. Use fresh epoxy.
Good turning.