My Rose Root Blossoms Into A Unique Vase
 May also be viewed via YouTube, Vimeo, and Facebook – Best right here!
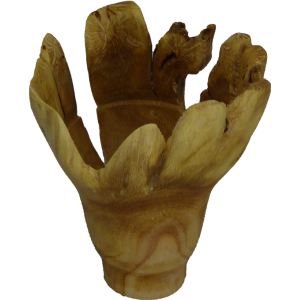
I dug up an old rose bush from my yard. (Please do not report me to the Rose Club). The root is large enough for at least a couple of turnings. But exactly what should I turn with this unusual wood. I consulted with another woodturner and finally decided on a first project.
This vase is about 3″ tall and 3″ in diameter. It is finished with walnut oil. I tried to preserve some of the bottom roots and voids between roots. I carved out the bark inclusions and did a lot of hand sanding.
It is a conversation piece.
Good turning.
Walnut Cross Grain Box – An Exercise In Mounting
 May also be viewed on YouTube, Vimeo, and Facebook — Best right here where you are!
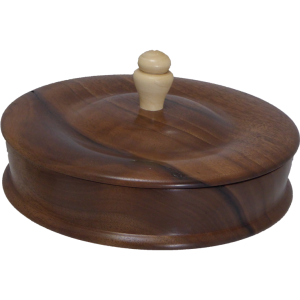
I turned this walnut box and lid to answer a challenge from the Utah Woodturners Club. We were to turn a lidded box and bring it to the club meeting.
The box is about 5 1/2″ diameter by 3″ tall finished with lacquer. The wood is seconds from a gun stock supplier. Very pretty walnut. The finial is hazelnut.
This project has two challenges. First, a black streak runs through the 3″ thick walnut. I wanted to take advantage of this color. However, the black streak is also a hairline crack that has weakened the wood. I treated this crack several times with CA glue.
The second challenge is mounting the wood as turning progresses.
- Mounting the raw block with tail stock pressure while cutting a tenon on the top.
- Mounting using this top tenon while cutting an expansion mortise on the top.
- Mounting using the bottom mortise while parting the lid from the base.
- Mounting using the bottom mortise while hollowing the base.
- Mounting using the inside of the box while cleaning up excess CA glue from the bottom.
- Mounting using the bottom mortise while cleaning up excess CA glue from the inside.
- Mounting using the top tenon while turning the underside of the lid and turning a mortise on the underside.
- Mounting using the top tenon while expanding the last mortise to fit the chuck.
- Mounting using the underside lid mortise while turning the top.
Whew! a lot of mounts.
Good turning.
You Mean – That Wood Had a Platter Inside?
 May also be viewed via YouTube, Vimeo, and Facebook. But best right here.
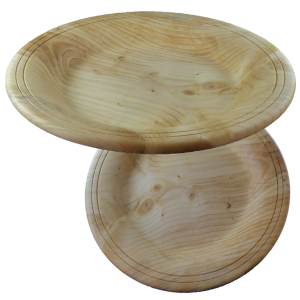
This project comes from a block of pine I received as a raffle prize at a woodturning club meeting. Initially, I was disappointed that it is pine, a softwood, that I don’t like to turn.
It has been a while since I turned a platter. I could not see a deep bowl in the half log — only possibly a platter.
For a platter, I mounted the wood to a screw chuck after chain sawing a good slice. Then trued the face before rounding off the perimeter. Then cut a mortise to receive my larger jaws. Then completed the bottom side of the platter.
After reversing the platter, I turned the rim first while the wood was still stable. Then extended the hollow down to the bottom. Finally, I finished the remainder of the inside hollow.
This 12″ by 2″ platter is finished with walnut oil.
Good turning.
Limbs Lashed Together For Rustic Wood Bowl
 May also be viewed on YouTube, Vimeo, or FaceBook. Best right here!
This project has been a long time in development. While looking at my stash of hazelnut suckers pruned last year, I wondered if I could line up three or four pieces and then turn a bowl.
The problem was how to join the limbs together. They could not remain separate and function together for a bowl.
My first thought was to use dowels to join them. That seemed tacky to use common dowels for a fine woodturning even if the exterior is rustic.
Next thought was to route a groove for a spline. I would mill the spline from the same wood as the limbs. This seemed to be a reasonable plan. Then, I started the project by turning each limb individually to round and smooth the ends.
With the ends nicely done, it was time to use the router. Then as I laid the limbs side by side, I remembered the work I did as a Boy Scout for the Pioneering merit badge. The difference was the scale.
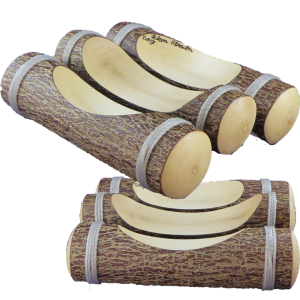
So I racked my brain to remember the process. I used nylon string to lash the limbs side by side. It looked like a small raft.
On a large threaded wood faceplate, I centered the raft with the tail stock. Using scrap, I screwed blocks around the raft and used hot melt glue for final stabilization. Masking tape protected the wood. Duct tape provides a little measure of stability but not much.
Then I hollowed out my rustic raft bowl. But I’m not sure exactly what to call this type of woodturning.
It is about 5 by 4 inches.
Good turning.
Peeps Do Not Fit In This Turned Easter Basket
 May also be viewed on YouTube, Vimeo, and FaceBook.
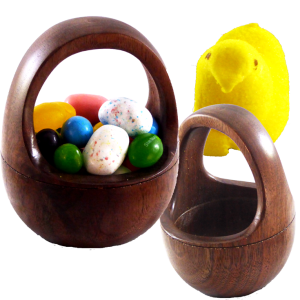
To celebrate Easter, my wife suggested an egg shaped Easter basket. It did not have to be large – small would do nicely. Once I understood her request, I decided the best approach would be to turn an egg shaped wood box. Then glue the two parts back together before cutting windows in each side of the longer, small end of the egg.
Well, here it is. A walnut Easter basket a little over 3 inches tall and 3 inches in diameter and finished with shellac. At this size, it can hold my favorite mini chocolate eggs and jelly beans. Sorry, no peeps can fit in this basket.
The wood was dry, having been harvested when we lived in Texas over 25 years ago. Essentially, I turned an egg shaped wooden box then carved out the handle.
Good turning.
A Small Emerging Bowl From Spring Pruning
 May also be viewed at these links on YouTube, Vimeo, and Facebook. Best right here!
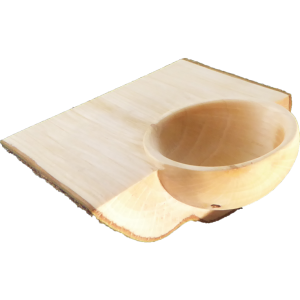
After recently observing a demonstration in a local woodturning club, I had to turn an emerging bowl. This is the best way to hammer home what I observed. Then I can explore alternatives and combine features.
In this video, I went much further using green wood from a hazelnut branch removed in spring pruning. Squared lumber would have been an easier place to start but I am a glutton for punishment and went for a natural edge leaving the bark intact.
The limb was about 3 inches diameter. I initially cut it about 8 inches long. My process was:
- Prepare a waste block to fit my chuck. On the opposite side, I bored a hole for a mortise.
- Mount the limb and cut a tenon on one end.
- Glue together the mortise and tenon with Titebond II. Let dry overnight.
- Turn a perfect hemisphere on the end of the branch. Any imperfections will show up later.
- Saw the branch in half – a rip cut.
- Mount the half to a faceplate using hot melt glue and additional scrap blocks for support and security. The center of the bowl must be exact to the axis of rotation of the lathe.
- Relieve the new top surface leaving a small lip around the bowl. This is with the tail stock in place to ensure a good hold.
- Remove the tail stock and hollow the bowl.
- Clean up any remaining marks and edges by sanding.
- Finish with walnut oil.
Since the wood in green, I’ll keep it wrapped in plastic wrap and a paper towel to retard moisture loss.
The challenge in this project is mounting irregular wood, turning a perfect hemisphere, and turning off center wood.
Maybe I should have turned my first emerging bowl from dry square stock?? Yet, it turned out very nice.
Good turning.
More Natural Edge From Spring Pruning – Rustic Napkin Rings
 May also be viewed via YouTube, Vimeo, and Facebook – But best right here!
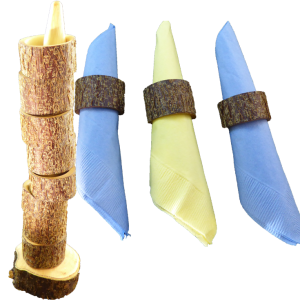
In this video I am again using a sucker I had pruned from a hazelnut tree. This time, I’m turning a set of natural edge rustic napkin rings with a stand for their display and storage. This is a set of eight rings about 1 1/2 inch diamter and about 1 inch long finished with walnut oil.
The challenge in this project is cleaning up the centers. Since the entire outside is bark, only the inside had to be sanded.
Still, it is a simple but repetitive project. One for a woodturner or looking for the totally unique dining accessory.
Good turning.
From Pruning Sucker To Natural Edge Wood Box
 May also be viewed on YouTube, Vimeo, and Facebook.
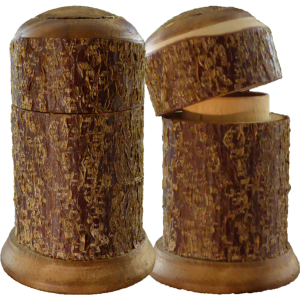
In my last video I used a sucker I had pruned from a hazelnut tree. Now, I’m continuing with the same wood, just higher up. This is a natural edge box. What is natural edge? Natural edge is where the wood’s bark is incorporated as a feature in the turning. In this case, the bark is the entire outside of the box.
However, because the wood is such a small diameter I had to figure out how to mount it to my lathe. Rather than using scrap wood, I used walnut as an additional feature of the box.
The box is over 3 inches tall and about 1 1/2 inch in diameter finished with shellac. The lid’s interior is 1″ diameter. The base’s interior is 7/8″ diameter.
The process:
- Prepare the body then part off the lid portion.
- Hollow the lid.
- Fit the lid to a tenon on the base.
- Using the base as a jamb chuck, finish the lid.
- Hollow the base
- Mount the base to a jamb chuck and finish the base.
Good turning.
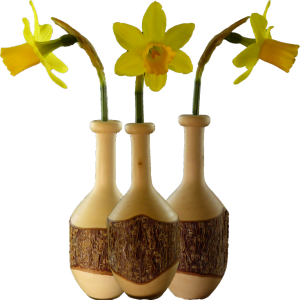
Anxiously Watching For Spring – A Natural Edge Bud Vase
 May also be view on YouTube, Vimeo and Facebook.
Where I live the snow has melted and early flowers are blooming. I have spring fever especially from being cooped up after my ski accident.
I found a hazelnut sucker I pruned off last spring and determined to turn a bud vase to welcome spring. The hazelnut was a perfect size for a small bud vase that could keep some of its bark as a natural edge.
Hazelwood is very light colored. I plan to use any I can salvage as a replacement for holly.
My bud vase is about 4 inches tall and 1 1/2 inches in diameter. It is finished with shellac friction polish.
I welcome spring.
Good turning.
Injured Reserve
My grand-daughters convinced my to learn to ski.
But, I had a disagreement with the rope tow.
Now I have a cracked rib and have to take a break to heal.
Unfortunately, break activities do not include woodturning Yet!