Woodturning A Crazy Droopy Segmented Bowl
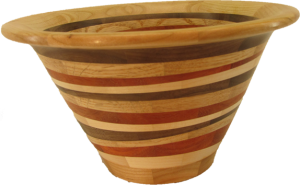 While at the Utah Woodturning Symposium I picked up a book about Ray Allen showing his segmented work. It was inspiring and inspired this project.
Normally, segment rings must have perfectly parallel faces or else the bowl looks weird. In this case, I want the bowl to look weird — the rings are deliberately not parallel.
After gluing up the rings, I sawed them on the band saw in a somewhat diagonal manner. Then proceeded to glue up the rings to make a droopy bowl before turning it.
Woods in this bowl are: cherry, maple, padauk, oak, walnut. There are 112 segments plus 1 plug in the bottom. It is 8 inches in diameter and 5 inches high.
Transforming An Old Fence Post Into A Rustic Fence Post Vase
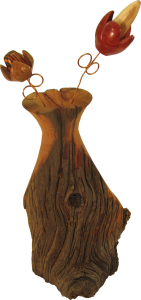
I’ve invited Russ Coker from a local club to turn one of his favorite projects, a fence post vase. He salvages old fence posts from Wyoming that are mostly cedar and turns them into a vase. The wood is weathered and very, very irregular.
His process is:
- Mount the wood between centers.
- Evaluate the wood for features and where to turn.
- Glue down any loose wood with CA.
- Turn a vase neck.
- Turn a dovetail mounting tenon and remount the timber to a 4 jaw chuck.
- Drill the top.
- Flare the hole and form a neck.
- Sand the turned areas.
- Apply a solution of boiled linseed oil to the weathered wood.
- Apply French polish to turned areas.
- Saw off the tenon and sand the base.
His primary tool is a large skew. He does not want to call it a weed pot because a fence post vase sells much better.
This piece of wood was scary due to its shape but turned out beautiful.
Be Safe.
Home Made Cole Jaws For Woodturning Large Bowls
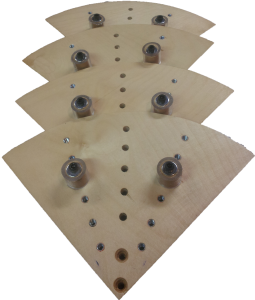 I’ve needed a set of large chuck jaws to remount bowls in order to turn their bases. I’ve used jamb chucks successfully but want to expand my options but not pay the high price of commercial cole jaws. So, I’ve made my own 17″ wood jaws to fit my vicmark chuck.
Steps:
- Cut plywood to the size desired. Do NOT cut into individual jaws.
- Layout the center, 45, and 90 degree lines.
- Position a set of metal jaws on the plywood and mark the hole positions.
- Punch and drill holes for mounting to the chuck. Counter sink.
- Mount plywood to the chuck base.
- Using the lathe, mark concentric circles 1 inch apart.
- Saw the jaws apart and shape them.
- Center punch the intersection of the 45 degree lines and the concentric circles.
- Drill a 1/16 hole at each intersection.
- Drill a shallow hole for the t-nut flange on the reverse side — using the small hole for guidance.
- Drill holes for the t-nut shaft at each intersection.
- Epoxy t-nuts to jaws ensuring no epoxy gets onto the threads.
- Slide vinyl tubing onto a dowel.
- Cut the dowel and tubing to 1 inch lengths for posts.
- Using the lathe, center drill each post.
- Glue the vinyl tubing to the dowel
- Sand and finish to taste.
Materials
- Baltic birch plywood
- 8 bolts matching those used for your chuck for longer for the additional thickness of the plywood.
- 8 Cap screws long enough to go thru the post and the plywood base but no further (safety)
- T-nuts for all intersections
- 1 piece 3/4″ hardwood dowel
- 12-16″ vinyl tubing 3/4″ ID
Turn a beautiful bowl base.
Be Safe – Use slow speeds appropriate for wood jaws.
Finish Woodturning Rough Turned – Alcohol Soaked Bowl
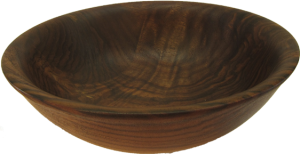 This is a followup on the rough turned green bowl of a few weeks ago. The bowl is now dry after having been soaked in alcohol. This is about six weeks instead of the year typical (for me) of air drying an typical bowl.
In this video I remount the now dry bowl to reform the tenon and the exterior. Then flip the bowl over into a chuck to turn the inside down to about 3/8″ wall thickness. Finally, I flipped the bowl back around again into a set of home made cole jaws to turn the foot.
After this experiment, for green turned bowls, I’ll:
- Rough turn the bowl.
- Soak overnight in denatured alcohol. (minimum 4 hours)
- Remove and let the alcohol dry from the surface.
- Weigh and record the weight.
- Wrap the rim with brown craft paper.
- Put latex tube loop around bowl’s rim.(optionally) Still skeptical whether this helps.
- Weight periodically until weight stabilizes.
- Remount and return the bowl as in this video.
A Triple Multi Axis Egg Cup Challenge Answered
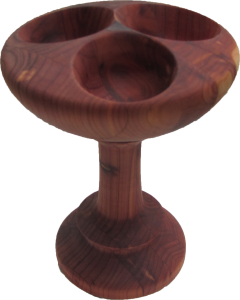 After last week’s egg cup, Larry joked “why not an eccentric egg cup”. I took that as a challenge.
This triple egg cup is turned from red cedar and finished with beeswax and mineral oil. The turning axis was shifted 1.25″ in three directions 120 degrees apart to turn the hollows for the eggs. It could also serve as a jewelry stand, a candy dish, or a display stand.
Special safety precautions were considered to ensure that I would not get hurt while turning it.
This project is for experienced turners only.
Utah Woodturning Symposium Egg Cup – Not On The Clock
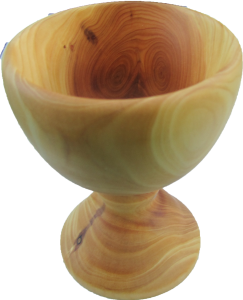
While at the Utah Woodturning Symposium, I participated in the Egg Cup Turning contest. In the contest, either two individuals or two teams of two woodturners competed against each other to turn an egg cup as quickly as possible. Many who had participated in previous years turned their egg cup in about 30 seconds. My time was about 2 1/2 minutes. Not bad but not the fastest. Mine was decent but not what I call a finished piece.
Upon returning home, I decided I needed to turn another egg cup to satisfy myself that I could do better not in terms of time but in a finished piece.
This egg cup is juniper finished with beeswax and mineral oil.
I’m happy with this egg cup although I don’t like soft boiled eggs and will never use it to eat an egg. Now I need to turn an wood egg to display.
Multi-Axis Turning Screwdriver With Ferrule
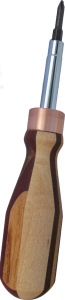 A little bit ago, I made a simple handle for a 4-in-1 (actually 6-in-1 but I never use the hex driver). At the time, I noted that eccentric techniques could prevent the screwdriver from rolling easily.
Here’s the upgrade.
I shifted the turning axis 0.25 inch in opposite directions to turn two opposing flatter curves.
In addition, I added a ferrule made from a copper plumbing fitting.
Per request, I’m also showing how I removed the handle from the store bought screwdriver. Although I doubt that this process is anything to emulate.
The wood is a lamination I made several years ago for another project containing walnut, locust, maple, and other woods.
The screwdriver handle is finished with my mix of mineral oil and beeswax.
Your choice – either is a great project – this one or the previous video.
Enjoy!
Reverse Chuck And Finish A Green Turned Bowl
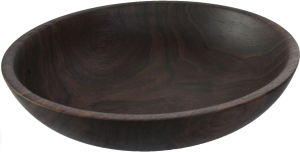
While waiting for my recent wet walnut bowl to dry, I decided to actually finish another one I rough turned several years ago. (It did not really need that long to dry).
This bowl I held between a closed chuck and the tailstock to refine the mounting tenon and then to re-turn the exterior. While I was at it, I sanded and finished the exterior with walnut oil.
After reversing in again into the tenon, I turned, sanded and finished the interior.
Then reversing it yet one more time to complete the foot.
I think it’s beautiful. I hope my sister can enjoy it.
Segmented Woodturning Plans Using MS Powerpoint
I’ve had many request for more information on how I use Microsoft Powerpoint to plan my segmented woodturning projects. This video shows the advanced features I employ.
This video is only for those already familiar with Powerpoint. It assumes you understand basic operations and only need a little bit more of an edge so you can use Powerpoint in this manner.
This video shows how to create a master template that can be used over and over for many projects. As a master template, you will not accidentally select, move, delete the background grid while you create the drawing for your next project.
The master template contains a grid from which to estimate sizes.
After creating the template, switch to normal mode to create a drawing.
Using the freeform tool, draw multiple, connected straight lines to outline the desired shape. Do NOT hold down the mouse button. If you do, you will be hundreds of data points that make future refinements more difficult.
Then refine the drawing by making selected straight lines into curves then manipulating the sizing handles to refine the size and shape of the bowl or other project.
Finally, using the rectangle tool, draw a rectangle to represent your typical segment size such as 0.5 inch by 1.5 inch. Use the right click menu to size the rectangle to your exact measures. Also, color the rectangle your preferred color but at 50% transparency. Then duplicate, move, and stack these segments over the drawing.
Refine the position and size of segments to provide sufficient wood for the project as drawn.
From your diagram, create a cutting size of layers, woods, and segment sizes.
Then at the lathe, let the project evolve into a beautiful expression of your creativity.
If you want more specialized software, then you’re welcome to part with some cash that you could otherwise spend on tools. There are other software programs available such as at woodturnerpro.com.
A Natural Edge Bud Vase For Mother’s Day
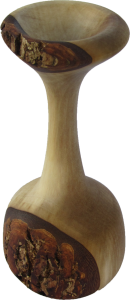 I needed to make a bud vase to go with the flower I made for Mother’s Day. I chose a wet piece of gum wood and shifted the turning axis to include a natural bark edge. I finished this little vase with walnut oil. Despite the off-axis turning, this is still an easy woodturning project.