Woodturning – Table Saw Cutting Jig For Thin Segmented Rings
For convenience or if there are problems viewing this page, this video is also posted on YouTube and FaceBook.
Help. Please apply your creativity to my problem.
As I create more segmented projects, I like the look of thin segment rings. To me, thick segments look blocky many times.
The segmented woodturning books recommend milling wood stock to thickness. This seems to be a huge waste of wood. Alternatively, some recommend removing excess thickness while mounted on the lathe – again, a huge waste of wood. Some go so far as to splitting a segment ring with a parting tool. While this does not waste so much wood, when a segment ring is parted off, there is some excitement while the newly parted ring spins freely on the lathe and frequently breaks.
Some woodturners saw segment rings on a bandsaw. With good jigs and fixtures and a finely tuned bandsaw and a very good blade, this can work for smaller diameter rings. For larger rings, the exposed saw in the middle of the ring is a very scary safety risk.
Can I use a table saw? Often table saw jigs use the miter slots. However, this limits how to adjust segment ring thickness.
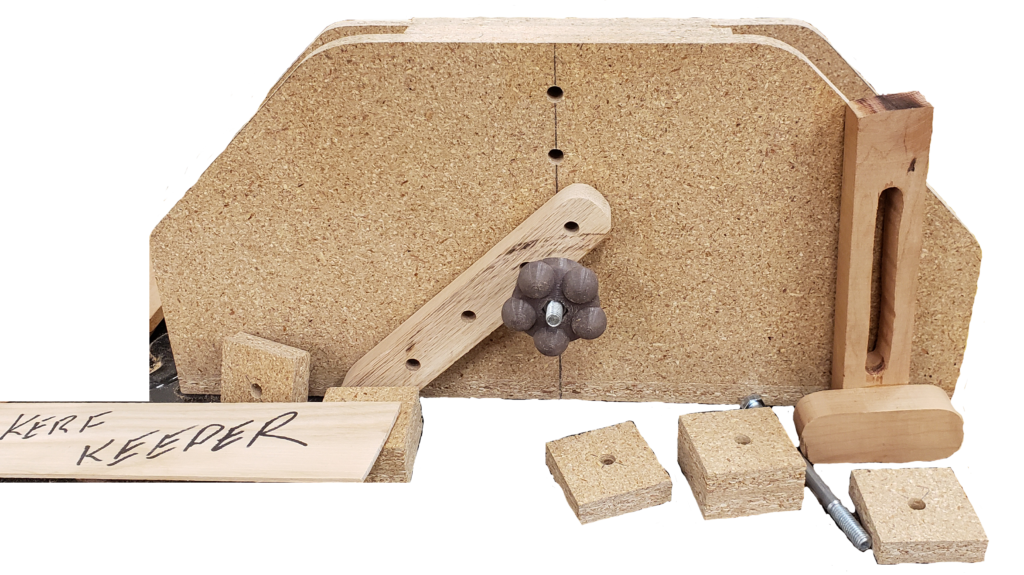
So, I made a box tall enough to support the biggest segment ring I can turn on my lathe. To resist tipping, the box is about 8 inches wide. 20 inches long seems to accommodate large segment rings through the saw blade.
A series of 3/8 inch holes allow a bolt for clamping. Originally, I wanted the lowest bolt to be higher than the maximum saw blade height. This did not work for smaller segment rings.
A large segment ring is secured with a bolt through one of the hole through the center of the segment ring and a cross piece of solid hardwood. Knobs on both ends of the bolt enable secure clamping.
Smaller segment rings cannot clamp the same way due to the possibility of the saw blade hitting the bolt. Instead, I used a different clamp cross piece. This clamping wood has a cross piece to distribute clamp pressure to the full diameter of the segment ring. The clamping bolt is above the segment ring and below a spacer block. Cinching up the bolt clamps the smaller segment ring.
In use, I first make sure the saw blade is as high as possible accounting for how many passes it may take to cut the ring and that the bolt placement will not interfere with the saw blade.
I then position the box against the rip fence and adjust for my target segment ring width.
Then clamp the segment ring in place. Slowly make the first cut, then rotate the segment ring for the next pass. In later passes, clamping pressure may tend to squeeze the saw kerf excessively. A thin slice of wood sized to the saw kerf is my “kerf keeper”
Final cleanup is similar to any other segment ring construction.
Since Covid-19 prevents me from collaborating with other local woodturners, I will appreciate your feedback and suggestions.
Enjoy!
Thank you for this idea, I really like it. One thing that I do not like is when your hand is close to the blade, but that is just my thought is all. I really like your videos and turnings Please keep sharing. Jerry from Gardnerville Nevada
Can you suggest a guard or protection for the left hand?
Happy new Year.
Alan
Alan, seems like a lot of work. Why don’t you just purchase the wood at the thickness you need or set up your bandsaw so that you can resaw the thickness you want? I have a very inexpensive bandsaw that I bought when I just started out in woodturning. It wondered like a snake. I watched some videos on resawing and set up the bandsaw properly. I was able to get the saw to cut perfectly straight. It takes patience but once you have it set up, you can save the setup for future resaws. It’s a lot less work than your approach. Plus I can now resaw boards that I couldn’t do before. I think the table saw is more dangerous than the bandsaw. No matter which saw you use, shut off radios, TV’s and telephones. Don’t allow anything in your shop that can distract your attention while you are using your equipment. That means no people, dogs, cats, bird, etc.
Safety is always number one in any shop! Have a happy and healthy New Year.
Best regards, Richard
To me, gluing thin rings is a pain especially when I need multiple thin rings at the same diameter. Hence my search for an effective solution post ring glue up.
Happy New Year Richard
Alan
Alan,Happy New Year. I think the jig worked better than I thought. Looked like the smaller clamp would be safer, but similar to a finger board putting pressure on the blade. Since it’s clamped to the jig might not be an issue. Sounds like the shop get togethers would be fun, and sadly missed, hopefully get them back soon.
God Bless,
John
I really miss the Saturday “Timber Turnover” sessions.
I like the setup for the smaller rings better than the larger rings but cannot think of a way to unify the approaches.
Happy New Year John
Alan
Alan; The only drawback is the waste cause by the TS kerf. The same jig used on the bandsaw with a thinner blade, using the same techniques would eliminate a bigger waste of kerf. Therefore, by cutting the leading edge instead of the bottom edge of the ring prior to each repositioning. IMHO, I have found that the ring will still need a surface truing for gluing regardless of either method. Personally I start with a stock slightly thicker than expected results, sand or finish the ring surface for gluing with a belt sander or lathe.
Kudos on including a kerf keeper into the design.
Congrats on the ornament challenge. I didn’t think as much originality or innovation was demonstrated as prior years. But it did give some purpose to this dreadful year.
Resp.
Jack
Yes, the kerf is a waste but is the same size as the parting tool I would use on the lathe.
I wish I could avoid eliminate the surface cleanup. Seems to be a fact of life.
Please mark your calendar for next year’s challenge. I want to see your ornament there,
Alan
Hi Alan,
Your jig is very well designed and it looks safe in your video demo. My comment is that you do not need to remove your hold down bar as many times as you did in the video. Just reposition the ring after each cut…
Your jig is BIG but safe and very functional!!!
I would use a 1/16” Diablo blade. On my small table saw that blade will cut 2” depth and most Segmented Rings are thinner than that.
I think a SMALLER jig design could be made and be just as safe but easier to just leave it set to split rings. Using the Miter Slot.
As follows:
A 1/2” lower sliding platform with the miter bar glued under it. 6-8” width should be stable enough.
An upper platform 1/2” thick with two slots riding on the lower platform and adjustable left/right to set ring thickness. A 90 degree fence / ring support with the two or three holes for the lock down bar. Two 90 degree gussets to ensure the fence is 90 degrees to the blade.
This will be a lot lighter and compact (space saving) and requires no adjustments if you mostly cut 3/4” rings in half. The 1/16” blade will save wood. Easy to just set in the miter slot and ready to cut.
To change ring thickness, loosen the two knobs for left/right adjustment. Set a spacer bar against the saw blade and bring fence into position, tighten the two knobs.
If you have 1” dressed lumber you can get three nice thickness rings from each glue up.
Hope that is helpful. Have a BETTER 2021 and May we all be able to gather soon to enjoy our hobby.
Peter
First, Yes, I removed the ring way too often. I was trying to assess how much the kerf was cutting into the next ring. If I accept that I need to reposition nearly as many times as the segments, then I could loosen slightly, reposition, and clamp again.
2nd, Thin kerf would be nice.
3rd. If I interpret your design correctly, the ring can still rest against the saw surface rather than on top of the cross sliding platform.
I have a nice rip fence system that I wanted to leverage. The miter slot was my backup choice.
Happy New Year.
Maybe add some sort of stop to jig behind segmented section for saftey?
Can you elaborate on the stop? is it to help hold the ring or for left hand protection?
Thank you
Alan
to hold the ring from rotating or being thrown back from initial contact, sort of using the entire jig as a push stick
Okay, I think I understand.
Thank you
Alan
Safety
really enjoy this website, its shown me a lot.
Thank you Paul
Happy New Year
Alan
Why not just use the table saw to cut the strips narrow then cut the wedges seems more efficient
That is a choice and I like to have a lot of alternatives to choose from
Thank you
Alan
Great idea! Thinner kerf blade would be a plus. Shortening the length of the jig would also help with moving it. Using your idea for the small ring clamp for all sizes of rings would be better, remove the possibility of hitting the center pin, and allow for fewer cuts and therefore fewer chances for mistakes.
Like you, my bandsaw is not perfectly set up for thin re-sawing.🥴
Overall a terrific idea, and smaller but same height might be better. I find it safer to use jigs that are a bit lighter. I would also consider putting a skin of laminate on the bottom for a smoother glide.
Happy New Year!
Jon
Thinner kerfs would be a nice enhancement.
I also considered laminate on the bottom but do not like to over-engineer too much while the jig is still evolving.
Alan
I have been wondering on how to solve the same problem with thin segmented rings.
The kerf keeper is the answer – Thank you
Right – this would not work without the kerf keeper.
Alan
A clever jig for making thin rings. You could glue up various thicknesses of wood, cut your segments and then glue them into rings. I just looked to see if I had a sample on my web site and I don’t have a segmented section – shame on me, I’ll have to correct that. However, on the home page is a large hollow form (Indian pattern) and it has some narrow pieces mixed with larger ones and they were done by gluing thin strips to larger ones before cutting the segments.
Interesting combination of lamination and segmenting.
Alan
An interesting idea, I really love it.
Off to Share
Please watch the update coming today for some minor updates.
Alan