Woodturning A Double Vase – A Growth Experience
 This video may also be viewed via YouTube, Vimeo, or FaceBook. Best right here!
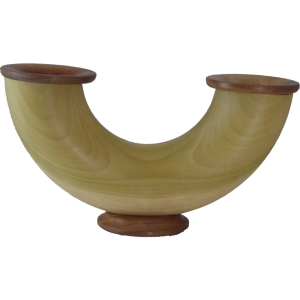
I have seen double vases. Now it is time to turn one myself.
In preparation, I made an internal template and an external template for a circle. For the internal template, I cut a circle for my desired size from scrap vinyl flooring. Then I glued a cross piece to make a semicircle with a crossbar. The external template is made from a square of the same material. I turned a circle for the exterior size in the center. Then I sawed across the diagonal staying outside the line. Then sanded to the line. Next time, I make this I plan to revise this template to have a quarter circle and a separate 2/3 circle. This should address the problem of the center core of the project being in the way of the template.
My process:
- Rough out and cut a mortise for an expansion hold on one side.
- Reverse the poplar onto the chuck and turn a semi-circular hollow near the perimeter. I used the internal template to guide the shape and size. Aim for a perfect semi-circle and uniform wall thickness. Cut a mortise on this side.
- Reverse mount and cut the exterior. Use the exterior template to guide the shape.
- Saw the wood in half following the grain direction.
- With white glue, glue the two halves together. Sand to clean up the glue joints.
- Turn caps for the two vase necks and a small base.
- Sand a flat on the bottom of the vase.
- Glue the caps on the neck and the base to the bottom flat.
My wall thickness was not uniform. This caused the caps not to be centered to the exterior of the neck. This is where I can improve on for the next time.
Woodturning A Tai Chi Exercise Ball
 This video may also be viewed on YouTube, Vimeo, and Facebook. May as well stay right here.
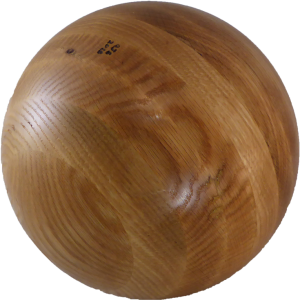
I do not currently do custom woodturning projects for others. So when a viewer approached me for an advanced Tai Chi ball, I said no. But nothing stops me from showing how it is done. He would have need it about 8″ in diameter.
So I found an oak board about 9″ wide, surfaced it, chopped it up, and glued it all together again into a big block. It’s cold right now in my shop so I brought it inside to cure for a week.
Then on to turning it. No problem here other than it is the largest ball I’ve turned to date. Still the cupped faceplate process worked just fine.
I supplemented the process by marking out and cutting an octagon first. A sphere can be inscribed into an octagon. Once the octagon was ready, I divided each side for a sixteen side block. Then it was a simple matter to round off the remaining points.
Then mount the cup centers and rotate the sphere so that the old equator line runs between centers. Whittle down the ghost image at the top but leave the equator line as much as possible. Then mark a new equator line.
Again rotate the sphere so that the new equator line runs between centers. Again whittle down the ghost image at the top leaving the equator line.
At this point, I evaluate the sphere. Is it round? If not, do another rotation pass and try again.
Once it passes, I start sanding using the same sequence for each grit. For this size of sphere, I power sanded it starting with 80 grit and going to 320 grit.
My Tai Chi ball is finished with bath in walnut oil.
I don’t practice Tai Chi, but I have an advanced ball if I ever start.
Wood? Turning A Valentine’s Vase From A Tagua Nut
 This video may also be viewed on YouTube, Vimeo, and Facebook. All the same – best right here.
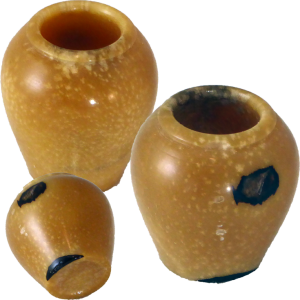
When I see a good demonstration, I have to try it myself. That is the case here for a tagua nut. The demonstrator was Clive Christiansen. He has turned hundreds of tagua nuts.
Tagua nuts used to be used for buttons as a substitute for ivory. With the advent of plastics, they have been replaced.
My little vase is a little over one inch tall and a little under one inch in diameter. No finish – only a good buffing.
Enjoy.
Woodturning A Tall Ash Goblet
 This video may also be viewed on YouTube, Vimeo, and FaceBook. Best right here where you are.
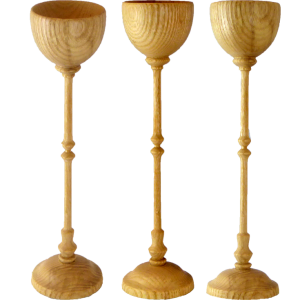
It’s been a while since I have turned a goblet. A piece of ash from our club wood raffle seems perfect. But there are issues to be dealt with.
The major issue is the length of wood hanging out from the chuck. I had to be careful not to have a catch that would rip the wood out of the chuck. In fact, I did have one such catch but the project survived.
I first hollowed the cup portion while I still had a lot of wood to stabilize things. Then the exterior of the cup. With the cup done, I gradually worked down the stem sanding and finishing as I went. The final scary part is parting off the base after all that work.
My goblet is 2″ diameter and 8″ long finished with shellac.
A Stylized Bowl From Club Raffle Wood
 This video may also be viewed via YouTube, Vimeo, and FaceBook. But you’re here already with the best seat in the house!
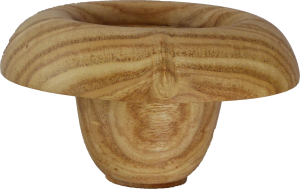
Part of our club wood raffle is encourage turning something from the wood. So, my natural inclination was to turn a small bowl from this wood that I think is ash.
However, with the small size, I wanted to dress it up a little. So, I reduced the diameter of the center hollow portion and reversed the curve on the lip. The tradeoff is a smaller bowl but I think this shows off the grain more. It is also more difficult to turn.
The finished bowl is 5 inches diameter and 3 inches high, finished with walnut oil. I like it.
Enjoy!
Helping Maple Firewood Achieve Its Life Purpose
 This video may also be viewed on YouTube, Vimeo, or FaceBook – Best right here.
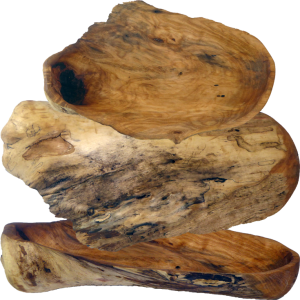
When my brother came to visit and to turn a people feeder, the chunk of maple he brought did not make it into the people feeder.
Yet, it had some unique characteristics, particularly a knob where wood had grown over a broken limb. Despite a long spell in the firewood pile, it still called out to soar as a thing of beauty. I finally relented but could not figure out how to use my lathe.
Instead I used a Proxxon carving tool first with a carbide cutting wheel, then a rasp, and finally with a sanding disk. I hollowed out the remaining chunk trying to preserve the weathered exterior and that beautiful knob.
While I did focus on removing wood, my larger focus was to not leak my blood onto the fresh wood. Those cutters would cut my flesh as easily as they cut wood.
When finished, I applied a generous soaking from walnut oil.
Maybe it can sit near the people feeder for other candy.
Woodturning A People Feeder – Feeders Are Not Only For Birds
 This video may also be viewed on YouTube, Vimeo, and FaceBook.
As I noted in the last video, my brother came to visit and brought his agenda – to turn a “people feeder”. The wood he brought did not work out. So, we used what I believe is gum.
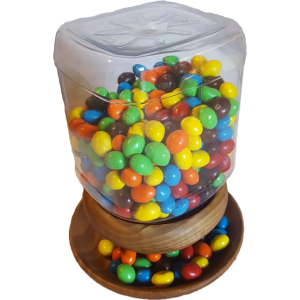
A people feeder dispenses candy from a hopper into a shallow dish. A people feeder has four parts: 1) a clear container for the candy; 2) a lid that fits the container; 3) a upper portion that holds the container and has hole for the candy to drop through; 4) a shallow dish from which one “feeds himself”. a dowel keeps the two wood pieces together.
This people feeder is about 7 inches diameter finished with Howard Butcher Block Conditioner. This one is designed for peanut M&M’s which are more difficult to dispense than plain M&M’s.
Useful Links
Home Made Vaporizer for “Pyrography”/Woodburning
DIY Pyrography Pen And Tip For My Woodburning
Enjoy
Maple Firewood Bowl – This Ugly Duckling Is Not A Swan
 This video may also be viewed on YouTube, Vimeo, and FaceBook.
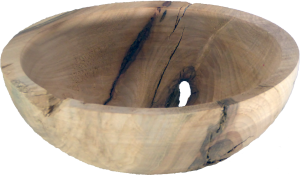
My brother came to visit and brought his agenda – to turn a “people feeder” from a piece of big leaf maple he salvaged from his firewood. The people feeder has potential but what about this firewood. The wood had some character like a large knob that maybe was burl or an overgrown limb. But it also had character in the form of cracks.
In this video, I start to turn this wood to see if we can use it for the people feeder. As you’ll see, it did not become a people feeder.
Kinetic Art – Don’t Let Glass Have All The Fun
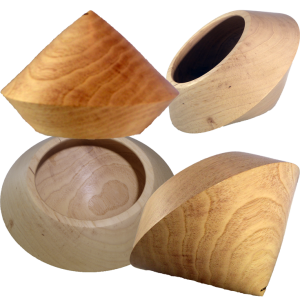 This video is also available via YouTube, Vimeo, and FaceBook. Best right here!
After seeing a decorative glass item at a craft store, I had to try to make a similar wood item. The original was a hexagon, mine is a round. The original was glass, mine is wood. Mine can roll around.
I’m not sure what the wood is. It has many characteristics of maple but is much more porous. My piece is eight inches in diameter and five inches tall. It is finished with lacquer.
What would you do with it?
Happy New Year.
Recycled Wood Snowman Offers Season’s Greetings
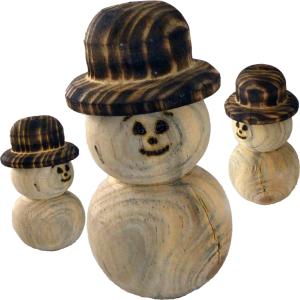 This video is also on YouTube, Vimeo, and Facebook.
At our last woodturning club meeting, I won a chunk of wood in our raffle. It was a mystery wood salvage from a members job from discarded packing material. What do I do with a short piece of 4×4 with drying checks.
In the Christmas Ornament Challenge, there were several very nice snowmen. But, I did not want to try for a very nice finish on this wood. I decided to keep him rustic and only slightly sanded with coarse sandpaper. Even if he were rustic, my snowman needed a formal hat as all ther other snowmen have. It’s a peer pressure thing. For his hat, I burned the wood surface with a mini propane torch.
Then I used my pyrography tools to burn in his facial features. He is a stunning 5 inches tall and just under 3 inches diameter. He has no finish. His center is drilled out to keep his weight down. After all, he has been on a diet this year so far.
I have no firm idea of what kind of wood he is. But it does resemble pine.
Merry Christmas