Reclaim Shop Space & Storage With Above Garage Door Shelves
May also be viewed on YouTube, Vimeo, and FaceBook. But best right here!.
Please plan on the 5th Annual Christmas Ornament Woodturning Challenge coming up in November.
With my new shop area, I need to get organized and stow away both shop and household items that are currently taking floor space. After researching above door commercial storage units, I decided to make the shelves myself from lumber.
Strength comes from:
- Mounting on the wall above the garage doors.
- Mounting on the side walls at each end.
- Posts from the attic about 9 feet on center.
- Torsion box effect from sheathing both top and bottom of the framing.
With the shelf there is about 20 inches of storage height – enough for most bins and boxes that would be light enough for me to lift on the shelf. The shelf is 32 inches deep and about 38 feet long. 220 volt electrical service runs to the center with 110 service to both ends.
Cost is about $250 including electric wiring.
One essential tool is my Paslode power nailer. It is cordless and hoseless running on a battery and a fuel cell.
BTW, with a project of this sort, there are no re-takes. No chance to re-shoot a segment. With space so tight and dark, photography and sound was very difficult.
Back to woodturning next week.
Simple Yet Fascinating Desk Toy: Magnetic Hourglass
 May also be viewed on YouTube, Vimeo, and FaceBook. But best right here.
Plan on the 5th Annual Christmas Ornament Woodturning Challenge – Coming in November
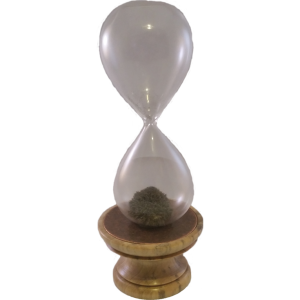
I’ve always been fascinated by the flow of sand thru an hourglass. This hourglass raises the bar.
Instead of sand, it contains iron filings. In the base is a magnet. As the ‘sand’ flows, the magnetic field causes it to stack in different shapes. When weight and gravity builds up, the shape collapses into a more compact shape. New grains then build on that base. Fascinating.
I purchased my hourglass thru Amazon. When in Amazon, search for “Magnetic Hourglass”. There will be several alternatives. This one is “Zicome Hand-blown Glass Sand Timer Magnet Magnetic Hourglass with a Iron Base” There are others now that I did not see previously.
Yet, as a woodturner, I want it to show some wood. However, in this case, the wood is only a simple base.
The base is an example of urban forrestry. A friend’s neighbor cut it down and I was fortunate to get several pieces. Some was not large enough for a bowl. This I turned into a straight cylinder, coated it was green wood sealer, and left it to dry in my shop. It has now been just over 2 years, the wood is dry and can be used for spindle projects like this one. It is finished with Mylands friction polish.
Good turning.
Exploring My Family History By Turning Tall Cedar Bowl
May also be viewed on YouTube, Vimeo, or Facebook. But best right here. 🙂
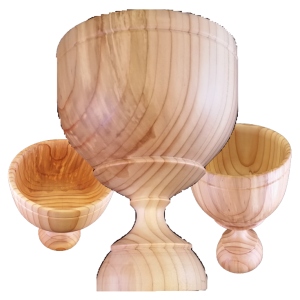
My mother has had a turned redwood vase for as long as I can remember. Upon reading the inscription on the base, my grandfather made it from redwood they obtained from a visit to the Redwoods two years before my birth.
My mother loves this bowl.
At our home in Portland, we had a large cedar tree that my mother liked when she visited us. We had to cut it down but I’ve saved some of the wood.
I’m going to turn another vase for my mother. This one from the cedar. Maybe she’ll put them together: one from her father; one from her son.
The vase is Titan cedar about 6 inches in diameter and 7 inches tall, finished with walnut oil and buffed. The turning blank was so large, I had to use my steady rest to keep the wood in the chuck. Here’s a link to the video where I updated the steady rest.
I’ve woodburned an inscription recognizing my grandfather in the base.
Good turning. Don’t forget the Christmas Ornament Woodturning Challenge coming in November.
Avoiding Stepping On Cracks In Semi Dry Elm Bowl
 May also be viewed on YouTube or Vimeo – but Best right here.
Don’t forget the Christmas Ornament Woodturning Challenge is coming in November.
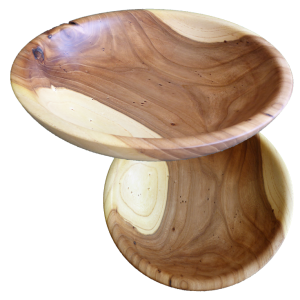
I picked up this chunk of wood at a local woodturning club meeting. It was supposed to be green elm. This made sense because the demonstration topic was green wood turning.
However, upon closer inspections and some turning, it quickly became obvious that it had been cut for some time. There were large end checks. Once into the interior of the wood, it did not feel wet enough for fresh green wood. It is elm – just not fresh green.
Those drying checks forced me to turn it smaller than originally expected. Yes, maybe I could have filled them but filling cracks in wet wood can become an issue also.
But the eleven inch by three inch tall bowl, finished with walnut oil, turned out very nice. I like the color of the heartwood.
To summarize the process:
- Mount on faceplate
- Mark and rough saw on bandsaw.
- Remount to lathe and tool the exterior, cut mortise, sand and finish.
- Reverse the bowl onto a scroll chuck.
- Shape and form the interior, sand, and finish.
- Reverse the bowl into Cole jaws
- Shape the foot, sign, sand, and finish.
- Buff.
Good turning.
Woodturning Natural Edge Off Center Bowl
 May also be viewed on YouTube and Vimeo – But Best Right Here!
Get ready for this year’s Christmas Ornament Woodturning Challenge – Coming November 2016
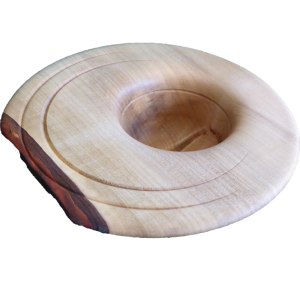
After seeing a demo at a woodturning club of a large off center bowl, I had to try one myself. At another club meeting, I picked up a bowl blank that I thought was elm. The blank had bark on one side – not the normal position for a natural edge bowl. But why not combine a side natural edge and an off center bowl.
Well, here it is. The rim measures about seven inches in diameter; the bowl is about two inches tall.
To summarize the process:
- Mark the center of the blank and an offset center. For the bark edge, I shifted the offset center about 3/4″ towards the bark edge.
- Mount to a faceplate and rough turn.
- Cut an expansion mortise on the bottom.
- Reverse the bowl onto a scroll chuck.
- Shape and form the outer portion of the rim including any rim decorations. It would be a good idea to sand also.
- Reverse the bowl onto a faceplate at the other center position.
- Shape the lower exterior of the bowl blending into the previously cut rim.
- Cut a new expansion mortise.
- Reverse the bowl into the new mortise.
- Hollow the interior, sand the upper exterior of the bowl.
- For my bowl, I cut a small groove on the inside of the bowl for another expansion hold. This will be used to finish the foot. Cole jaws are not an effective option because due to the offset rim.
- Reverse the bowl onto an expansion hold into the groove.
- Shape the foot.
- Sign and finish. I used walnut oil and later buffed.
This was a small block of wood for an offset bowl due to the need for enough wood for an expansion mortise. For this reason, the lines of the bowl do not flow as well as I had originally intended. A larger blank would be preferable.
Another learning is at the beginning to smooth an area on one face big enough for the faceplate in both positions. I used the rough face of the blank. Consequently, the turning plate of the bowl shifted slightly from one mount to the next causing the rim to be slightly thinner on one side.
Good turning.
Miniature Vase From A Rose Root – A Thorny Woodturning
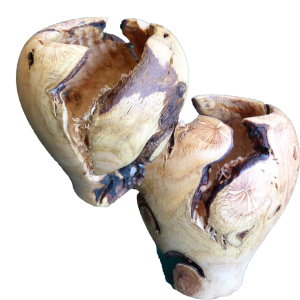 May also be viewed on YouTube or Vimeo – But best right here!.
I dug up a rose bush from my garden and saved the root. It was not very big but I thought that I’d try to turn something: either a small hollow form or a small vase depending on how the wood turned.
Well, turning was easy; keeping the wood mounted to the lathe was a frequent and big problem. I could not get an adquate grip with either hot melt glue or medium CA glue. I finally had to cut a mortise and tenon and use yellow glue.
After all that, the vase started to come apart due to the voids and cracks in the root ball.
In the end, the little 2″ vase has unique figure. I’ll be on the lookout for larger rose roots for future projects.
Good turning.
Watch this space – Christmas Ornament Woodturning Challenge is coming in November.
Woodturning Miniature Hollow Form With My New DIY Tools
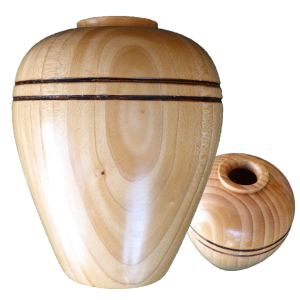 May also be viewed on YouTube or Vimeo – But best right here.
This little vase took some preparation. I did not have smaller tools to keep the top hole to a minimum. So, in the last video, I made a set from Allen wrenches.
This little vase is about three inches tall and two inches diameter. It is finished with shellac friction polish.
What is the fascination with hollowing so much thru a tiny little hole? You have to try to find out. 🙂
Good turning.
DIY Hollow Form Tools From Old ‘Alan’ Wrenches
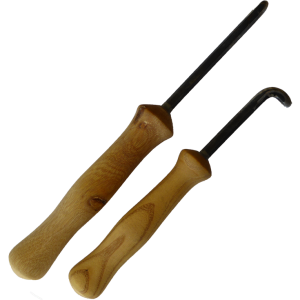 May also be viewed on YouTube and Vimeo — But best right here!
I’m planning to create a small hollow form for my local club’s current challenge. However, my current tools are large and would require a larger hole than I want to leave.
So, I’m grinding two old Allen wrenches to provide one straight scraper and one bent scraper.
Then I’m making a handle for each: one from fig; one from elm.
Next week, I’ll create the hollow form.
Good turning.
Woodturning Box Lid with Multiple Eccentric Axes For Unique Look
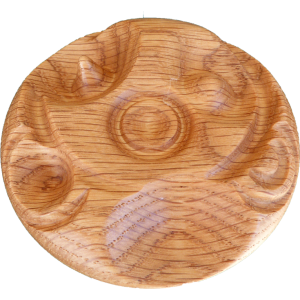 May also be view on Vimeo and YouTube – But best right here.
In the last video I turned a set of stacking boxes. My boxes need an interesting lid for the top most box – one that will provide interest and enhance the boxes.
The Infinite Axis Chuck provides a solution. The lid is red oak finished with walnut oil then buffed. The oak was shaped initially with standard techniques with one important feature. I cut a mortise on the underside to serve as an expansion hold while the top side was tooled. This mortise later served as the gluing surface to mount the wood to the Inifinite Axis Chuck.
The tail stock provides a clear indicator of where the turning center will be. The ball and tenon is moved to select the center of a new turning. Only light cuts with a spindle gouge are required, followed by sanding.
I’ve added a new page to my web site to define woodturning terms. The goal is to provide clarity about woodturning styles. Here’s the link. Your feedback will be appreciated.
I repositioned the chuck five times. The design is unique and can never be exactly duplicated.
Good turning.
Woodturning Shop Leftover Day: Segmented Stacking Boxes
 May also be viewed on YouTube and Vimeo but best right here.
I glued up this red oak into a stave lamination some time ago when I turned a travel mug. At the time, I thought I’d be making another but then changed my mind. Since then this lamination has been in my shop, was part of moving to Utah, and is in the way. It is much like food left over from a sumptuous meal that is still in the refrigerator.
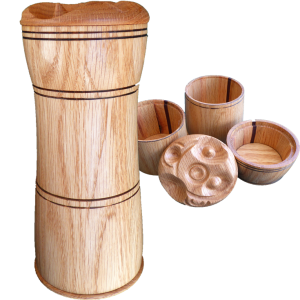
But it’s time to clean it out and enjoy it. Instead of another travel mug, I turned it into a set of stacking boxes finished with walnut oil. The set stands about nine inches tall and about 4 inches in diameter. Each box above the first is a lid to the box below it. Then I decorated another piece of wood to serve as the top lid. Each box is a slightly different diameter and a different height to accommodate different items, my wife may want to put in it.
To make this set of boxes, I had to fix a failed joint in the stair tread material. That joint was a factory joint. It’s a good thing it did not make it into a stairway. Then cut the lamination into sections and keep track of each to preserve grain orientation. I turned oak plugs to serve as the bottom for each box and the lid for the box below it.
It was a lot of tenon work with all the trial and error of fitting a tenon to a mortise – many times over.
I had a breakthrough when I needed to remove a flange of wood between the tenon serving as a bottom and the tenon opposite it (on the other side of the same piece of wood). Since it was also the wood riding on the face of my chuck jaws, I did not see, at first, how to remove the wood without damaging my tools or a very complicated process. The breakthrough was to cut a very small groove in the tenon serving as the base to the box. The sides of this tenon would be hidden once the bottom is glued into the sides. This groove then was sufficient for the dovetail jaws to grab. The gap that resulted was enough to remove the excess wood.
The lid is decorated using the Infinite Axis Chuck. That is the topic of next week’s video.
Good turning.