Knotted Back Muscles? Back Pain Relief With Celtic Knot
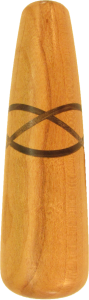
May also be viewed on YouTube.
After the previous video with a Celtic knot in a barbecue flipper, several comments included a suggestion to leave a little wood when the angle cut is made to keep the wood spaced correctly. In addition Michael challenged me to make a three loop Celtic knot.
In this project, I’m accepting his challenge and incorporating these suggestions.
A three loop knot requires three cuts at 120 degrees separation. Instead of milling the wood into a triangle, I made two plywood triangles and glued them to the ends of the timber.
Then it was off to the races.
This same process could be used to make Celtic knots with any number of loops. Just vary the end pieces and perhaps the cut angle.
This little handle is actually a tools to massage your back. You’ll need assistance from someone else to roll it on your back or to massage specific muscles with either end for different pressure.
Woodturning Celtic Knot On Pigtail Barbecue Tool Handle

May also be viewed on YouTube.
In this project, I’m making a handle for a barbecue turner. But not just any handle – this one has a Celtic knot.
For the celtic knot, I threw together a sliding cutting jig to ensure accuracy in the cuts that have to be just right.
A Celtic knot is a series of four angled cuts with a new wood slice inserted and glued in.
Meanwhile, I’m trying out a Jacobs chuck with which to hold drill bits while drilling on the lathe.
Woodturning An Ornament Or Birdhouse Stand

May also be viewed on YouTube.
In preparation for this year’s Christmas Ornament Woodturning Challenge, I decided to make my own ornament stand. It could also be used for a birdhouse or any other small hanging.
It is surprisingly easy to make. The base is scrap wood from another project. The brass is 1/16″ diameter brass rod but should be heavier such as 1/8″ diameter to be less bouncy.
This stand is finished with Mylands Friction Polish then buffed.
Woodturning A Wild, Crazy, Wavy Bowl
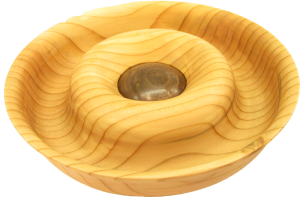 May also be viewed on YouTube.
After returning from the Utah Woodturning Symposium, I felt I needed to break out, break away from my habitual projects.
So, I found this chunk of cedar and went to work on it. It wasn’t the best piece of wood but I managed to turn a wavy profile.
It turns out to be an unusual double sided bowl. If you’ve seen one like it, I’ll be surprised.
Maybe it works for you, maybe not. But it works for me.
Approximately 11″ x 2″ finished with walnut oil.
Practice Woodturning A Basic Walnut Bowl
 May also be viewed on YouTube.
I contributed a woodturning experience to a church youth auction to raise money for youth summer activities.
In preparation, I’m turning a bowl similar to what I’ll have the auction winner turn – with some exceptions.
They will turn a softer wood like cedar. This one is hard walnut with some rot veins in it.
So much turning is second nature to me now, I want to review the basic process for turning a small bowl to be ready to coach a newbie again.
Woodturning Twisted Horns Of A Dilemma
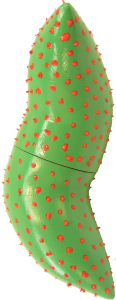
May also be viewed on YouTube.
I’ve wanted to turn this project every since seeing Michael Hosaluk demonstrate it.
It is basically a turned box but with a twist. The top and bottom are elongated. Then at the band saw, each is sliced, the segment turned about 180 degrees then re glued. In this case, the top and bottom segments were sliced and re glued twice each. This process gave them a bit of an arc.
The inside surface is distressed while the exterior is sanded into a flowing shape. Finally, the box is painted with acrylic paint and a texture applied of acrylic gel.
With no grain alignment, there is no “right” way to position the top with respect to the bottom. Thus, the box can assume many different shapes or characters.
When I first saw one of Mike’s I just had to pick it up, twist it around and try to figure out how he did it. It’s fun.
Woodturning Napkins In The Round
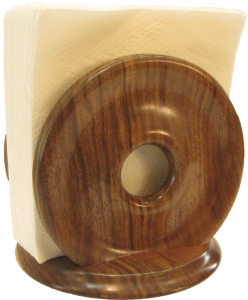
May also be viewed on YouTube.
I turned this napkin holder for my wife for Mother’s Day from walnut.
It consists of a round base and two round sides. The sides have a little wood sliced away so they can stand on the base.
The space between the sides is perfect for dinner napkins.
The walnut is beautiful.
My Woodturning Recipe For Deviled Eggs
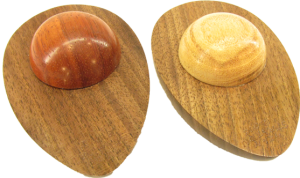
May also be viewed on YouTube.
Since spring has arrived, it’s time for picnics and barbecues.
How about some deviled eggs for those occasions?
I used the split turning technique for this project.
- Glue two pieces of walnut together with brown craft paper between.
- Turn an egg then split it into two halves.
- Turn the deviled yolk and glue it to the half egg.
- Proudly serve your deviled eggs at the next appropriate occasion.
Enjoy!
Remount & Finish Woodturning Naturally Spalted Aspen Bowl
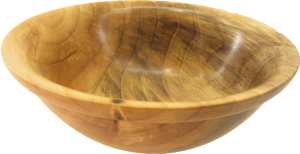
May also be viewed on YouTube.
This aspen bowl was turned wet or green several years ago. At that time, I put it away in a paper sack for it to dry. Apparently, it was extra wet or did not dry very quickly, since a large growth of mold or fungus developed on the surface. I brushed off the mold or fungus and left it to continue drying without a paper sack.
After wet turning, I did not expect much from this bowl. Aspen is a fairly plain wood. This being the case, I was in no hurry to finish turn it.
However, I was in for a big surprise. Rather than being a problem, the growth did me a favor by imparting additional color and interest to the bowl thru spalting.
The bowl is eight inches in diameter and three inches in height, finished with walnut oil and buffed to shiny perfection.
Woodturning A Free Climbing Bear
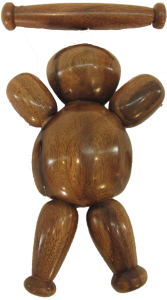
May also be viewed on YouTube.
In this project I re-create a climbing bear I had made for my children with one significant improvement — he’s round. The former bear was a flat piece of wood in somewhat the shape of a bear. While any self-respecting wild bear my not recoginize this one, I do and I think the next generation, my grand children, will recognize.
This bear is a split turning, meaning that there is another just like him from the other half of the blank. In addition, I turned his four legs, top bar, and beads.
He is finished with shellac friction polish which is then buffed to a nice shine.
Alternatively pulling his cords helps him climb up.