A Mushroom in Apricot
This woodturning project is a small natural edge mushroom in apricot. I saw Walt Weis at the Oregon State Fair making his version of mushrooms. The mushroom is 3″ tall, and a little over 2″ across the cap and finished with mineral oil and beeswax. The wood is green or wet apricot harvested about 9 months ago. Already in 1 day, the drying process has created some interesting irregularities in the mushroom cap and stem.
Walt turned his mushrooms a little off axis to elongate the mushroom cap. The challenge is in the mushroom’s cap. With the offset axis and irregular edge, it’s hard to find the edge or to ride a gouge’s bevel. On the outside of the cap, I’m cutting a lot of air. On the inside of the cap, it’s very easy to catch the wood. Any catch here would destroy the delicate cap.
Rot in the wood was a challenge. I had to discard several inches of my blank to find enough sound wood. I intended to keep the bark on the natural edge. I treated the bark with CA glue a couple of times but it still flew off later. Oh well, I still have the natural edge of the wood itself.
This video also shows the danger of using a cloth on a lathe. My paper towel got caught three times. Had it been cloth, I would be nursing a mangled hand now. I would not wear a glove when working a lathe for the same reasons.
The finish is mineral oil and beeswax in a 75%/25% ratio. This is Eli Avisera’s recipe. Beeswax has a fringe benefit of smelling like honey when you use it. On this mushroom, I used the oil/wax also as a sanding compound. It both lubricates the sand paper and captures the dust that would otherwise go into the air.
I’ll be making more and larger mushroom; size will always depend on the available wood.
Petite Square Bowl in Cherry
This woodturning project is a petite square bowl in cherry. It was based by a demonstration by Eli Avisera. The blank is 5″ square, 3/4″ thick, finished with semi-gloss lacquer.
The challenge with a square bowl are the corners. The corners appear as shadows; it is hard to know exactly where to start cutting with the gouge. Eli Avisera had a great tip here: Start in a little bit from the corner but only rub the bevel of the gouge; Back out to the corner listening to the sound of the gouge; Once the sound changes, turn the gouge slightly into the wood to start cutting.
Following Eli’s example, I made a template for the curve of the bowl and a foam padded jamb chuck. Matching the curves of the bowl and the jamb chuck is important to avoid pressures later with finishing the bottom of the bowl.
To form the arcs in the inside of the bowl: number the sides; starting with side 1, loosen the chuck and pull the side of the blank 2 or 3 mm out from the chuck and re-tighten; Make the arc with the skew; repeat with sides 2 thru 4. Eli used a skew, but next time I would use a square nosed scraper.
Eli recommended handing sanding with a flexible rubber block to preserve the edges of the bowl. Often leading edges would be rounded over when sanding on the lathe. However, based on a tip from a woodturner at the Oregon State Fair, I used a power sander with the bowl still on the lathe. The trick is to keep the sanding pad on solid wood and very lightly sand out the the corners – watching very carefully the angle of the pad versus the wood. It worked.
I should have stopped with 4 pairs of arcs, the fifth set was disappointing. But, overall, this is a nice project.
Unusual Salt Shaker in Maple
This woodturning project is a salt shaker or salturn in hard maple. It was inspired by a demonstration by Terry Gerros from Willamette Valley Woodturners to Cascade Woodturners. The blank is 3″x3″x6″ tall, finished with shellac friction polish,
This salt shaker does not have a removeable opening or removeable top. Nor does it have holes in the top from which salt is shaken. Instead, the bottom is a small funnel. As salt is poured into the funnel it flows thru the single hole into the cavity of the salt shaker. The inside is an inverted funnel that keeps salt inside until shaken. When shaken, salt re-enters the hole on top of the funnel and shakes out to season the food.
People expect to turn it upside down but don’t get salt that way. Then they look for holes in the top and don’t see any. Then they wonder how in the world, this is supposed to be a salt shaker.
The design and turning is simple. The most difficult part is fitting the funnel to the top or outside of the shaker.
To reduce sanding dust, I applied an mineral oil/beeswax mixture before sanding. This could also have been used for a final food safe finish. This idea came from Eli Avisera, an Israeli woodturner. I melted 4 ounces of beeswax in 1 pint of mineral oil in a double boiler. (Please do not risk a fire by applying direct heat to wax.) It makes a soft paste that is easily applied with a paper towel.
I made two.
Wood Spin Top With Box in Maple
This woodturning project was inspired by a visit by Eli Avisera to the Cascade Woodturners. Eli Avisera is an Israeli woodturners. He made a small wood spin top that also served as a lid to a small box. He made it look so easy, I just had to try it myself.
Fortunately, I had some hard maple in my wood stack that was perfect for the project. I started with a block 2″ x 2″ x 4″. Unfortunately, my four jaw chuck capacity is just under 2 inches. So I had to be very careful to size the tenon to fit.
I followed the same sequence of steps that Eli Avisera did. I’ll have to do another few hundred to catch up with him. The top and box are textured that is then colored. V grooves mark out the texture sections. V grooves in the box were also burned with a wire. I burned the lip of the box with a piece of scrap wood.
In the end, the top spins so it is a success. I should make a few more right away to cement in the process.
Wood Bowl in Apricot From Green Wood
This woodturning project, a small bowl turned from apricot, was a nice short fun project.
The wood came from urban forestry, meaning, I helped a neighbor cut down the apricot tree he didn’t want in his yard anymore. I was glad to help in return for the wood.
At the beginning of the bowl turning, I had not decided whether to turn in completely in one session or to turn it in two sessions – months apart. The difference is when the bowl has time to dry. If turned in one session, I turn it to final size, then let it try. As it dries, it shrinks and warps into its own unique shape. If turned in two sessions, the first is only to rough turn it with the walls much thicker than anticipated in the final bowl. Then let it dry and shrink. Hopefully, then the walls were thick enough to accomodate the shrinkage. The bowl is remounted in the lathe to finish it.
This one already shows typical shrinkage and shape changes resulting from drying after turning. This definitely marks the bowl as green turned and gives it special character from the unpredicable shrinkage.
This one is a keeper – a small nice beautiful bowl.
Green Apricot Bowl Disaster
Sometimes, we need a reminder of the risks involved in woodturning projects, particularly when turning a bowl harvested from random sources, sometimes called urban forestry. I harvest wood where ever I can hoping for a big turning blank and fantastic grain and figure. This apricot wood blank was from the main trunk, one of the biggest pieces from the tree. I had grand hopes for it.
But the bark inclusion that I was counting on to enhance the bowl actually extended thru almost the entire blank. Many years ago two limbs were growing almost parallel for many years. Moss invaded the space. After many years, one limb was cut. the tree continued to grow and bridged over most of the gap.
In this case, I did everything right except to lower the guard on the lathe itself. I had my face shield on and had noted to myself several times not to stand inline with the bowl. I was almost ready to remount the bowl into the four jaw chuck and hollow the interior.
Then I removed the last bit of new sap wood holding the bowl together. A big piece hinged over and flew off hitting me and my face shield in the middle of my forehead. Sorry, not a lot of blood but definitely a hard whack.
My new resolutions – Use the lathe guard on all green bowl turnings at least until I can turn the bowl around for the hollowing phase; Keep wearing my face shield no matter what; Avoid standing in line with a spinning bowl.
Always keep safety in mind – Otherwise, it will be knocked into you.
Wood Egg Box in Walnut
Please register for updates over at right =======>>>>>>>>>>>>
My twin granddaughters wanted me to make them each a wooden egg. My thoughts went directly to a hollow egg, or wooden container. With dry urban harvested walnut, I started to turn the two eggs.
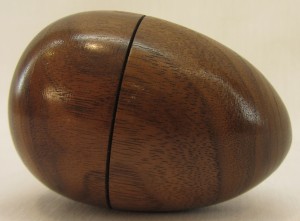
The first egg was nearly a disaster. I had turned the tenon too small for my dovetail jaws. No problem, I have a set of smaller jaws. But these are not dovetail. So, Had to turn the tenon down a bit more. Then while turning, these jaws only contact the wood at 4 very narrow points. The dovetail jaws would have grabbed at 8 points. The consequence was that the blank popped out of the jaws several time when I was more aggressive.
I had fitted the top and bottom before one of these popouts. When remounted, the rotation was very slightly different when made the fit between top and bottom very loose. So, turn the joint down and start fitting again. Oh well. The first egg turned out more ball shaped than egg shaped.
So I moved to the second egg and had much better luck. The second egg is featured in this video.
Sea Urchin Ornament 2 on Juniper
This woodturning project is the second in a response to a challenge by Cascade Woodturners to make “something” from a juniper block. I had made one already but decided to make a second sputnik sea urchin ornament. It has a sea urchin shell with juniper finials above and below the shell. The lower juniper finial is also a pedestal for the ornament. It could be a Christmas ornament or a decorative ornament.
To prepare for the first sea urchin, I reviewed two videos by Cindy Drozda who makes beautiful turned wood finials. I also practiced on two small ones before the real thing. In the end, the finials turned out well.
At the end of the video, I compare these two ornaments to decide what direction to take for the next set.
This one is a keeper. I’ll show off both these wood turned ornament at Cascade Woodturners shortly.
Sea Urchin Ornament on Juniper
This woodturning project is a response to a challenge issued by Cascade Woodturners to make “something” from a juniper block, I decided to make a sea urchin ornament with a sea urchin shell with juniper finials above and below the shell.
To prepare, I reviewed two videos by Cindy Drozda who makes beautiful turned wood finials. In the end, the finials went fairly well. I practiced on two small ones before the real thing.
This one is a keeper. I’ll show off this wood turned ornament at Cascade Woodturners shortly.
Wood Bracelet For My Girls Part 2
With the pending visit from my grandchildren, I decided to make a bracelet or bangle for each girl. In the last video, I made the first set of three.
But with six granddaughters, 3 bracelets is not enough. I needed three more.
With three under my belt, I changed them a little bit. In the first batch, I used four segments per layer. In this batch, I use eight segments per layer. There are two segmented layers with one layer of thick oak veneer between them. Woods are Purpleheart, Padauk, Honey Locust, Oak and Maple.
With the practice from the previous batch, these went more easily. I treated each joint with CA glue to fill any possible gap and to seal the wood.
The bracelets were finished with a shellac friction polish.
I finished the last bracelet about 11:30 pm. The next morning the grandchildren started arriving for our family reunion.
They were excited for the bracelets; Two made additional requests for a wooodturning project. That will be in the next video.