Woodturning A “Double Bowl” Bowl
 Sometimes you have to break rules to discover new territory – Other times breaking rules to know the consequences and to appreciate rules.
It’s the same with woodturning. There’s a lot of opinions(rules) to size the base of a bowl. But why not a double bowl – one where the base is also a bowl?
In this video, I’ll turn a small bowl that can be inverted to be a smaller bowl on a large base. When necessary, it is a large bowl with a tall base.
Let’s have some fun.
Woodturning A Handy Playing Card Holder
 When my grandchildren come to visit, we often play games involving cards. But their hands are not big enough to hold their “Hands”. In the past, I have cut slots in flat pieces of wood to hold cards. But still, they would like to hold the cards in their own hands.
After seeing a plastic card holder in a store, I decided to make my own card holder from wood and turn it on my lathe.
The card holder has 6 pieces:
- 2 – large walnut discs about 4 inches in diameter with a 1″ hole. Each is tapered on the inner surface to allow cards to be easily inserted. I profiled the outer surface with an ogee.
- 2 – small maple discs about 1.5 inches in diameter with 2 1/8″ holes about 3/4″ apart.
- 1 – hollow walnut cylinder 1″ in diameter with an inner 3/4″ hole. This cylinder does not show – its job is to keep the large discs aligned.
- 1 – elastic hair band. The hair band is threaded thru one maple disc and pass thru the inner cylinder, then thru the opposite maple disc. Then the hair band is tied with appropriate tension. I applied a little CA glue to the hair band in the area that I wanted to trim the band to keep it from fraying.
This is a simple project with a lot of benefits.
Giant Sanding Disc Offers Options For Woodturning

After seeing a large sanding disc at Dale Larson’s shop here in the Portland area, I decided to get one for myself. They’re not available commercially except as a very expensive stationary tool. So, I decided to make my own.
I ordered a piece of 1/4″ thick aluminum 20.25″ square allowing a little bit for truing the shape. This is the maximum that can fit on my Powermatic 3520 lathe. This aluminum came from http://www.discountsteel.com/ for about $62. The aluminum plate is bolted to an 8″ steel faceplate. Howard Borer, a member of Cascade Woodturners, made the faceplate for me; they are available from woodturning mail order companies. Make sure you fit your spindle.
I ordered my sandpaper discs from Amazon – Woodstock D1342 20-Inch Diameter PSA 60 Grit Aluminum Oxide Sanding Disc, 2-Pack by Woodstock.
 Fortunately, Howard also helped me saw the aluminum into a circle. After sawing, we mounted it to a lathe and trimmed the outer edge with a heavy woodturning scraper at very slow speed.
After returning home to my lathe, I checked for run out and added a small shim cut from a can of 7 Up soda between the faceplate and the aluminum.
Another plus over a commercial disc sander (other than the high cost) is that I can use the entire disc surface on my lathe – no part of the disc is covered by a table. Plus, I don’t have precious shop floor space taken up by a monstrous 20″ stationary sander; I do have a 12″ stationary sander.
I use the sand disc to flatten rims and bottoms of green turned bowls and to flatten segment rings for segmented projects.
A Segmented Walnut Egg Box
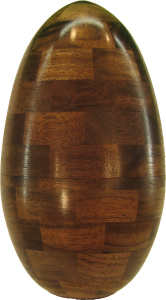 An Australian viewer asked me to make a wood egg shaped box. The main difference is the shape and no base for it to stand on.
I decided to not make a typical end grain box but instead take a segmented approach. I glued up twelve rings of eight segments each into two stacks. The top rings were plugged with walnut dowels. Each stack of rings was mounted to a threaded wood faceplate. BTW that totals 98 pieces. (8 segments x 12 rings + 2 plugs) I used Titebond extend glue to minimize glue humps at joints.
Then instead of starting with a solid spindle, I started with the two stacks of rings – One for the top and one for the base.
Then
- On the top, form a mortise for the joint, hollow and finish.
- On the base, form a rabbet or tenon for the joint, hollow and finish. I blew it here and had to take off the tenon and start over.
- Complete roughing out the top and part off from the faceplate.
- Place the top on the base with a paper towel to stiffen the joint.
- Refine the overall shape focusing on the top, then finish the top.
- Cut a shallow groove just under the joint on the inside of the base to enable reverse mounting the base.
- Mount the base to a chuck in an expansion grip and finish the base.
In the end, this is a fairly standard box process.
My egg is finished with shellac friction polish.
Sometime in the future, I’ll make a short ring to serve as a stand.
Function Versus Beauty – A Segmented Object Of Art
 Last weekend, I was inspired during a visit to the Tacoma Museum of Glass. While I saw all sorts of glass objects, few were functional items. Why do I think a woodturned object must be functional. NOT! As a first step into this brave new world, I decided to make an object similar to one I saw during the exhibit by Australian glass artisans. The only problem is — I’m not sure what to call it.
Essentially, I’m turning a cone but at a slant. The segmented rings run parallel to the future base which winds up looking very oval.
The glue up is both easier and more difficult than a normal segmented piece. Easier in that I don’t have to pay much attention to exact ring positioning. More difficult in that the stack is shifted to one side and very difficult to visualize. The stack consists of 3 layers of 3/4″ MDF and 5 layers of segmented walnut rings about 11/16 inch thick. The top ring is plugged with a turned walnut plug.
I sawed the MDF base at a 20 degree angle and mounted the stack on a faceplate with hot melt glue. I also added some sacrificial pine at the other end. This pine will form a tenon that I’ll use later to reverse the mount. With all turning done, I sawed off the remaining MDF and pine, sanded and finished the piece with walnut oil.
It was a challenge to make but I like it. It sets the stage for many future variations as I abandon the requirement that my woodturning projects be functional objects.
My Leather Burnisher Doubles As A Vampire Stake
 A viewer suggesting making a leather burnisher. I was excited at the suggestion as it is another idea to exercise the eccentric faceplate system. Many would leave the blade as a cone or flatten it on a sander. To me, however, it was an opportunity to take the eccentric faceplate system for a spin.
This burnisher is made from cherry about 10 inches long; the bade is about 6 inches; the handle is about 4 inches. The handle contains four grooves to use to burnish edges of leather pieces: 1/8, 1/4, 3/8, and 1/2 inches. It is finished with beeswax and mineral oil.
After turning the handle and its grooves, I shifted the axis by 1/4 inch on the blade end by shifting holes in the faceplate. With the burnisher now turning off center, I turned a taper on one size of the blade, then sanded the blade.
Then I shifted the axis by 1/4 inch the other way and turned a taper on the opposite side of the blade. Sanding the blade is a challenge because I could not touch it directly. I sanded with long strips of cloth backed sandpaper.
A “Square” Playing Card Box”
 During a visit with my brother, we were playing cards and talking about possible woodturning projects. He suggested a box for the playing cards. I said, no problem but it would be round. He insisted that it should be square to properly hold the cards.
It was a puzzle but this video is one expression of this idea.
The box is square inside to hold the cards but round on the outside.
My first thought was a stave construction but that was a problem. For vertical or horizontal grain staves, there could be only for to maintain a rectangular interior. My walnut was not wide enough for this sort of stave.
Then I though of running the staves with horizontal grain – around the box. That was also fine except for the width again would not make the box tall enough. Okay, I could use segmented construction to form the lid. Even then, I needed a separate base and rim to make the bottom tall enough for the cards.
So, this box was quite a challenge.
The base is walnut; the lid is maple; the finial is walnut. It is about 7″ tall and a little over 4 inches in diameter.
The interior is large enough to hold several decks of standard sized playing cards. It is finished with friction polish.
My DIY Lathe Steady Rest
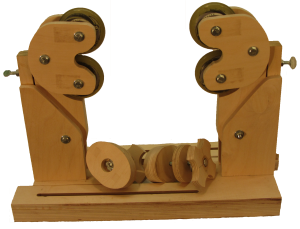
After using my new steady rest turning the travel mug, many viewer requested more information about the steady rest. So here we go.
It’s make from baltic birch plywood with layers glued together as necessary for thickness. The wheels came from a pair of roller blades I purchased at a local thrift store.
It works fine except I’d like to be able to more my tool rest closer when the steady is near the end of the workpiece. I think it can be much closer. But before I modify the base, I’d like your ideas.
I used 1/4 inch hardware. I will be doubling the nuts to prevent them from loosening.
I will appreciate all comments and suggestions for improvements. Thank you in advance.
Travel Beverage Mug

A couple of viewers suggested a video turning a travel mug. I have some leftover oak stair tread cutoffs from a friend and a 16 ounce travel mug insert from Rockler. This will be a segmented cup using stave construction.
First, I cut the oak into staves using a sled designed for stave segment cutting. With the sled I can safely and accurately cut the angles required on these staves which is 22.5 degrees. Eight staves are needed.
Then I glued the staves into half cylinders, sanded the faces to true them up, and glued the two halves together. I’m experimenting with Titebond Original Extend glue. This is supposed to have a more rigid glue line and be better for segmented construction.
I used cone shaped threaded faceplates for the initial cylinder roughing. As soon as possible I turned a tenon so it could be mounted in a 4 jaw chuck.
Next, I bored the center with a 2 inch forstner bit then the remainder of the hollowing with a round carbide cutter. This was the tough part — it was hard work. My home made steady rests provided more stability and security.
Next, I shaped the exterior including a rabbet for the lip of the cup.
This left me with the center of the base. This I bored out with a forstner bit then turned a plug to fit. After finishing the plug, I glued the insert into the oak shell.
This travel mug is finished with wipe on poly.
Easy DIY System For Eccentric Spindle Turning
 In this video, I’m going into greater detail on the faceplates and system used in making the doubly eccentric magic wand.
The system consists of 2 faceplates, 4 brass pins, and some plastic countertop laminate. With the system, I can exactly index most eccentric spindle turnings that use a tail stock.
Although I made these faceplates for magic wands, now I have many, many other uses to make repeatable successful eccentric turnings.