Turning An Eccentric Or Off Axis Wood Goblet
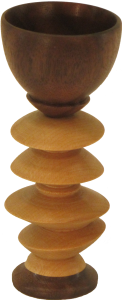
In this video, I try my hand again to turn an eccentric goblet. I’ll turn the eccentric stem separately from the cup and the base just to keep things a little easier.
The stem is 2×2″ maple about 6″ long. I started turning with the axis running almost corner to corner. Then as I finished a bead, I changed the axis. The result is a little guess and by gosh but I tried to keep the main stem somewhat in line as it comes up thru the beads. I sanded each groove as I completed it as I’m sure I could never reposition the wood back into that same position. I used a long strip of sand paper to keep my hands out of harms way.
But after several beads, the eccentric ghosts came to haunt my goblet. The stem failed and I lost what would have been the top third of the stem.
Now it became a salvage operation. I finished off the stem, then turned a cup and a small base from walnut. The hard part now was to carefully trim back the rough area from where the stem broke.
The goblet is finished with shellac friction polish.
This goblet does not have the dramatic sweep I intended – it’s kind of short and plump. But, I’ll be trying this one again. I cannot let the eccentric ghosts get the better of me!
Easy DIY Tenon Cutters
 I cut tenons regularly to join different pieces of a project together. They’re a common element but I really hate it when I cut one too small. The flip side is stopping the lathe so often to creap up on the perfect size. Many times I’ve used a open end wrench to help size.
But a viewer suggested I grind an edge on one side of the wrench. Then I’d have a tenon cutter and a tenon sizer in one tool.
So here we have a set from 1/4 inch up to 3/4 inch made from a cheap set of end wrenches. Grinding was not as simple as I had thought but not so complex in the end. All it took was a little time at the grinder.
Segmented Tea Light – More Safe Than Eccentric

Rather than respond to the challenge of an eccentric tea light, I choose to turn a segmented tea light with a bonus saucer to set it on.
The style of segmentation is called open segment meaning that there are gaps between the segments making up the ring. However, nearly every open segment requires a couple of closed segment rings for a top and/or bottom. Closed segment is where there are no gaps between the segments.
This tea light has a base of solid walnut; 6 open segment rings of walnut each containing 18 segments; and 1 closed segment ring of maple containing 12 segments. There is a total of 121 pieces. It is finished with walnut oil.
The saucer has a base of solid walnut and 1 closed segment ring of 12 segments for a total of 13 pieces. Together there are 134 pieces. The saucer is finished with walnut oil.
A Wood Toy Tippy Top
 I’ve turned several tops on my lathe but never a tippy top. A tippy top should start normally, then flip over onto its spindle. During this process, it reverses its rotation.
Physics students create monstrous equations to explain this reversal that are totally beyond me.
This wood is poplar with a walnut spindle. The poplar is decorated with colored marker pens and finished with shellac friction polish.
However, my tippy top didn’t tip. I don’t know what I should do differently. Is it the center of gravity? The spherical shape? Or something else?
There will be another one – I’m not quitting.
Woodturning Green Wood Bowl – All At Once
 The wood for this bowl came from a friend who lives nearby. When someone gives me a bunch of wood, I like to make them something from it. In this case, I gave her a choice of a bowl soon but that may warp a little and a bowl that would not warp but that would take much longer to make. She chose a bowl now.
This bowl is from green or wet cherry from her back yard. It is over six inches tall and about 5 inches in diameter. It is finished with walnut oil. Since it is still very wet, I told here to keep it in a grocery store paper bag for several weeks.
She’s happy with the bowl. I just hope it does not crack.
Woodturning Weird Rolling Doodad Toys

At the Desert Woodturning Rounding in Mesa Arizona, I saw a weird toy in the instant gallery. I studied it but couldn’t figure out how it was turned. Fortunately, the woodturner was nearby and explained both the simplicity and the critical portions of the toy.
 I had to make one. Unfortunately, I don’t remember what the toy is called – nor do I remember the woodturner’s name.Somebody, please enlighten me.
These are made from a common cedar 4×4, sealed with sanding sealer and painted with acrylic paints.
Bud Vases For Mothers Day
 Two brothers and I met recently for a woodturning Turnover. They wanted some supervised practice and training. We started with a project agenda to give them several woodturning experiences.
However, our well planned agenda was interrupted when our wives called back from visiting Saturday’s Market. They had seen bud vases and each wanted one for Mother’s Day.
So we switched gears to make a bud vase. It was a good experience; they turned out very nice.
Then then agenda took another turn. Bud vases for daughters and daughters in law for Mother’s Day. So we spent the rest of our time making bud vases in Apricot, Walnut, Poplar, and Maple.
We have a degree(?) of sibling rivalry. Please view all the vases at the end of this video and select which one you like best. Please put your selection in a comment below this video.
Turn A Seam Ripper For Quilting and Sewing
 February, at the Desert Woodturning Roundup, I met Wayne Wolfe. He showed me pictures of several quilt and sewing tools that he has woodturning. My wife said she wanted one – so off I go.
For the hardware, I purchased a seam ripper at a fabric store and discarded its lid. The wood is a exotic wood pen blank I purchased in an assortment. The woods were not labeled so I don’t know what species of wood it is.
Step 1: Mount in a chuck.
Step 2: Drill 1/4″ hole 1 5/8″ deep (for my ripper). Then enlarge the hole by one bit size down to 1/2″
Step 3: Turn a simple, easily held handle. A lot of beads and coves may show off turning skills but would be less comfortable to hold. Mine is finished with beeswax and mineral oil
That’s all – a simple but usefull project.
Turning A Green Wood Dish By Accident
For bowl turning, I’m always on the search for wood. And, when someone gives me some, I like to give them a bowl from their wood in return. Here, I want to turn a bowl from elm for a son’s friend who gave me the wood.
However, it turned out that the wood had a lot of cracks – not from drying – the wood had been sawn in half thru the pith, waxed, and sealed in plastic bags.
Initially, my plan was to rough turn the bowl then let it dry before finishing.
As I cut into the wood, the cracks appeared more and bigger.
First, I wasted off the top 1.5 inches to get rid of some real bad ones at the top.
Then as I hollowed the bowl, the cracks were apparent thru much of the end grain sides.
I decided to finish the bowl all at once but then the cracks became worse. I feared the end grain areas of the sides would disintegrate
Then I decided to cut down the sides until I found solid wood….
I wound up with a dish. That’s a real downer. I don’t know whether to be happy with the dish or sad that I wasted so much time and wood?
Faceplates and Drill Press Jig for Handcrafted Wood Buttons
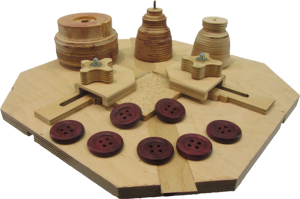 When Jari Hirvonen from Finland, asked how to make wood buttons, I had to pause and reflect, “What could be so hard about a wooden button?” The challenge is not in the individual buttons but in making them consistent with each other in pattern, hole positioning, and diameter. Very different from a one-off turning or even a series of similar turnings that never are used together.
I must credit a AAW discussion forum for highlighting the core problem: Consistent hole placement. But short of precisely measuring each hole and making sure the drill bit hits that spot – what is a woodturner to do?
My first thought was to use stops on the drill press. Even these seem to lack the precision that would be required.
Finally the epiphany, use spacers on each wing of a right angled fence. The width of the spacers would be the distance between holes. Great, now I just need something to hold the button blank down while drilling the holes and by the way, how do you turn them evenly and consistently.
As my thoughts evolved, I hit upon a solution that grew into a system.
- Modify the spacers to be exactly one half the distance between the holes. Now it would take two spaces to position each corner hole. The new spacers could be used to drill a consistent center hole. But I did not want a center hole in each button. Instead, drill the center hole on two waste blanks the size of the buttons and at least two corner holes.
- Now make wood faceplates: one for the spindle and one for the tail stock. I prefer threaded faceplates as shown in a recent video. Glue one of the drilled waste blocks to each faceplate. Use the center hole in the waste block to align it to the faceplates. Now we’re cooking.
- Next, stack up all the drilled button blanks on two brass rods. The rods are the same size as the holes in the buttons. The rods go thru opposing holes in the button blanks.
- Insert this stack into the corresponding holes in the faceplates. Note that everything is indexed to the spindle axis using those holes in the waste blocks.
- Turn the stack of button blanks as a single column. Watch out for short grain tear out. Near completion of the column, glue some sandpaper to a scrap block and sand the column. No need for fine grit sandpaper as the rims will be finished later. At this point, aim for a consistent diameter for the column of button blanks.
- Create a jamb chuck with a recesss sized to fit the newly rounded button blanks. (Remember the consisten diameter – I hope you measured it)
- Turn the face and backside of each button. This goes fast. Just watch out for tearout over the button holes. There’s a lot of fragile short grain. Try shear scraping. Don’t worry about the rim. Tooling the rim will just ruin the jamb chuck.
- Now take the spindle faceplate from #2 and reduce its diameter enough to have access to the entire rim area front and back of the button.
- Put short brass rods in opposing holes in the faceplate and mount a button to the faceplate. Bring up the tailstock to securing it. If you’re careful to keep pressure on the button, you can remove the tailstock for final sanding and finishing.
That’s it – an integrated system where the jig, faceplates, and chucks work together to deliver a consistent and beautiful results.
Free Sketchup models of the handcrafted button system are available at http://www.AsWoodTurns.com/ButtonJig