Handcrafted Wood Buttons For A Coat or Jacket
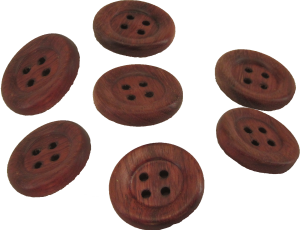 Recently a viewer, Jari Hirvonen from Finland, asked how to make wood buttons.
Hmmm.
Buttons need to be all the same size and same decorations. They’re also small and have those four closely spaced holes in the middle.
After some research, I made a drill press jig to conquer the drilling problem. My blanks then had four equally and uniformly spaced holes in the middle. So far so good.
Then how to get them all the same diameter. I made wood faceplates for both the spindle and live center. A center hole in each faceplates aligned to a scrap block drilled to the same pattern as the buttons but with an extra hole exactly in the center. I glued these scrap blocks to the faceplates using the center holes for alignment.
Now to turn the faces. Yet another chuck — this time a jamb chuck to hole one button at a time while turning the face and the back. I could not turn the outer edge at this time — it would damage the jamb chuck and reduce the wood holding the button in the jamb chuck.
So finally, I resorted to another faceplate — this time reusing one from when the buttons were stacked. This time two short brass rods held the button in alignment while the outer rim was refined. A rubber stopper on the live center kept buttons from flying around the shop.
The buttons are about 1.25 inches in diameter and just less than 0.25 inches thick. They are finished with a blend of beeswax and mineral oil. I only lost one button to a catch when turning the outer rim.
This project took some figuring, a new jig, new faceplates, new jam chuck. After that, the rest was easy.
I’ll show more of the drilling jig in a separate video.
Turn A Common Wood Stud Into A Segmented Bowl

Segmented Wood Bowl
Summers Woodworking issued a challenge: Make something nice from an ordinary 2x4x8 stud. I couldn’t resist. For me, that means it would have to be round. But how to turn a 2×4 into something both round and nice? Hmmm.
So I decided to make a large segmented bowl, using almost all of the 2×4. I’m not sure what kind of wood it is except that is is some kind of softwood. I noticed this especially when fine short grain tips of segments would break away.
I wanted the base to be a pinwheel design. So the segments tips are offset somewhat. But then with the tips breaking away, I had to inlay small wood discs over the points from both inside and outside the bowl. The pinwheel effect is not noticeable. The base is also inlaid within the bottom ring. Since the base is 8 segments and all other rings are 16 segments, I did not want the change noticeable from the outside. In fact, by inlaying the base as a disc within the bottom ring, the change is barely noticeable from the inside of the bowl.
The other six rings each have sixteen segments, gradually increasing in diameter to about 14 inches. The walls are about 1/2 inch thick. I did not dare go thinner with this softwood.
I turned the exterior with a large bowl gouge; the inside with carbide scrapers.
The bowl ended up about 5 1/2 inches tall. It is finished with gloss lacquer.
I now have a very nice, large bowl instead of a common 2×4 stud.
Woodturning An Easter Bowl Without A 4-Jaw Chuck
 A little while ago, a viewer asked how he could turn a bowl without a chuck. He has a nice piece of wood and a new lathe but does not own a chuck. For many years now, I’ve consistently used a chuck when turning bowls.
As it turns out, I recently purchased a mini lathe myself and don’t yet have a chuck to fit the new lathe. I figured now would be a perfect opportunity to try out the my new lathe and to take on the challenge of turning a bowl without using a 4-jaw chuck.
The last time, many years ago, I turned a bowl using only a faceplate, I left screw holes in the bowl’s base. But now, I consider leaving screw holes totally unacceptable.
So, this was a challenge for me and the project had its issues. But in the end, I have a very nice small walnut bowl about 5 1/2 inches in diameter and 2 1/2 inches tall, finished with walnut oil. There are no screw holes in the base.
For the first mount, I screwed the faceplate to what would become the inside of the bowl and shaped the exterior. Then I glued a waste block to the bottom.
For the next mount, I screwed the faceplate to the waste block. Centering the faceplate on the waste block was a challenge. Then I refined the exterior and hollowed the interior.
For the final mount, I screwed the faceplate to a couple of layers of MDF shaped to fit the inside of the bowl. This was my jam chuck. With a little padding between the bowl and the jam chuck, the tail stock held the bowl on the lathe while I turned off the waste block.
I will now go back to using a 4-jaw chuck and will purchase one for my new lathe.
Woodturning A Pot O’ Gold Bowl For Leprechaun Gold
 For St. Patrick’s Day, I need a pot for the leprechauns to leave me a little of their gold. Fortunately, at a recent club meeting, Nick Stagg demo his bowl turning techniques. And even more, he gave me a big block of ash that he had used as a jam chuck.
However, in my haste to leave town for a long trip, I neglected to protect the ash blank. While I was gone, it developed several large
checks in the end grain. I thought I would just turn the bowl down by one half to one inch to get rid of the checks.
Boy was I wrong, the checks went very deep. Now I have a small bowl for the leprechauns’ gold. But I’m not greedy – I’ll be happy with whatever they leave me.
This bowl is about 4 1/2 inches in diameter and about 4 inches in height. It is finished with mineral oil and beeswax. This wood was green — so there will be more shrinkage and warping. Hopefully, it will enhance the bowl’s character.
With what I learned at a Richard Raffan course I attended while on my trip, I changed my mount tenon to a small bead instead of a large dovetail tenon. It worked and I did not have to remount the bowl after hollowing to finish the foot.
We’ll have to see what happens to this bowl as it dries. If necessary, I can still remount it to thin it down a little and/or to remove bad warping.
Now, if the leprechauns will leave me a little gold…
Green Turn and Remount A Natural Edge Wood Bowl
 A year ago, a limb of a maple tree fell on a friend’s home in a storm. He gave me some of the wood for woodturning. From the wood, I turned two natural edge bowls.
The first bowl I turned all at once, finished it, then let it dry. I posted its video then. Since then, it has warped a little.
The second bowl I rough turned, waxed it, and put it away to dry. While drying, it has lost over 30% of its weight in moisture loss. It also warped.
The difference is that I have now finished the second bowl. Having left the walls a bit thicker allowed the bowl to warp and still have enough wood to turn it round again.
It is difficult to see the difference in a photograph. However, the first is a little oblong while the second is perfectly round. The irregular rim from the natural edge disguises the difference. Most of the wood was removed while still wet and soft from both. Sanding is more difficult on wet wood because it gums up sandpaper in a flash. Turning dry wood is a little more difficult than wet wood. Each process is fun, each has its challenges and benefits. The biggest difference for the second bowl is that it is hard to wait while the wood dries but the bowl is perfectly round.
Spin Top Turn Off From Desert Woodturning Roundup
 I had some fun at the 2013 Desert Woodturning Roundup in Mesa, Arizona.
While at a break between exhibits, a man came by offering some time to woodturn at a lathe. I said ok.
Later I learned that it was a timed competition including many of the professional presenters including Richard Raffan, Michael Hosaluk, and Matt Monaco. This made me nervous. For each round, two people came to identical lathes with identical tools. We had some time to mount a square block of maple, test the lathe, inspect the tools, (spindle gouge, bowl gouge, spindle roughing gouge, and parting tool) and get the lathe up to speed.
In the first couple of rounds, at least three of the maple blocks went flying off the lathes. With the time to replace the wood, they did not finish. This made me even more nervous. I decided I had no chance of winning against Richard Raffan. So I focused on finishing my spin top without it flying away and within the five minutes allotted.
There was not time to make a decent tenon or to check for round. Time was flying by. I did some things that cost me time that I would change and my design was slightly more complex than necessary.
In the end, I finished in three minutes and thirty-five seconds and won my round. I was nowhere close to winning the competition since Richard Raffan finished in 44 seconds with Mike Hosaluk right behind him at 45 seconds. A couple of the fastest tops were not quite round. But the only test was whether they would spin.
It was fun despite my nerves.
Easy Lathe Tailstock Lift Prevents Backstrain

The tailstock on my full-sized Powermatic 3520A is heavy. I have to remove it from the lathe to hollow a bowl or a hollow form. It’s so heavy that I worry about dropping in on my toes or straining my back. If I leave it on the lathe, I risk banging an elbow. Ouch!. It was time to fix this “Health & Safety” issue.
I searched for solutions including commercial solutions. They’re nice but expensive. A fellow woodturning club member used an electric lathe. Another viewer made a hinge to swing his tail stock off to the side.
I needed it clear out of harm’s way.
I purchased a wire cart and made an extension to the lathe bed ways. A short piece of plywood aligns the extension to the lathe.
With all in place, I easily pull the tailstock off and move it out of the way.
When I need it again, I push the cart against the lathe, it automatically aligns to the lathe and I push the tailstock back onto the lathe.
No risk now for dropping it on my toes or straining my back. No excuse now for moving the tailstock away to save my my elbow.
Rescuing A Cracked Green Turned Wood Bowl

Several years ago I rough turned a beautiful 13 by 6 inch bowl from a green or wet piece of ash. I promptly waxed the rough bowl, put it in a paper bag, and placed it on a shelf to dry. I intended to leave it for about a year.
More than the allotted time has passed. You could say that life interfered. In the meantime the bowl cracked severely while drying.
What a disappointment! I don’t want to burn it now that it is dry.
I decided to fill the cracked with a series of plugs from different hardwoods: Apricot, Walnut, and Maple.
After re-truing the tenon and smoothing the rim, I drilled one inch holes at the top of both cracks plus another to provide symmetry. After inserting a turned dowel into this first set of holes, I returned to the drill press to drill another set overlapping the first set. I repeated this process for a total of five sets of plugs.
Then I proceeded to remount the bowl, turn the outside and hollow the inside. The bowl is finished with walnut oil.
Instead of cracks I have a symmetrical design and a very nice, large ash bowl, much, much more than firewood.
Turned Wood Goblet For Valentine Kisses

I pruned a branch off my apple tree last winter and rough turned a small goblet. I had to dodge a lot of rotten wood to form the goblet. Then I waxed it, put it in a paper bag, and put it away to dry.
In the mean time, it has lost 34% of its weight while drying.
Now it’s dry and it’s time to finish this cup for valentine’s day treats. The cup is about 5″ tall and 3″ in diameter. CA glue has stabilized the rotten wood. The cup is finished with shellac friction polish. It was turned in stages: cup interior, cup exterior, and finally the stem and base. The wood was sanded and finished with each stage. Otherwise, vibration from the thin wood would have inhibited good turning.
Easy Wood Faceplates
 I’ve been using wood faceplates instead of metal faceplates with wood scrap blocks. A wood faceplate eliminates the risk of hitting a screw while turning. I can have as many wood faceplates as I want and keep it on the project until the project is complete. I can make any size faceplate that may be needed.
In a recent video making a segmented bracelet, I used two wood faceplates to build up the segment layers from both top and bottom at once. For that project I also used a reverse chucking alignment adapter to hold one faceplate in the tail stock with the other mounted in the head stock. With this mount, I was able to glue in the last middle layer to both at once on the lathe.
In this video, I turn a 6 inch wood faceplate.
- Mount a blank (poplar) on the face of a scroll chuck.
- Rough turn the blank to round and smooth the face.
- Cut a dovetail tenon.
- Flip the blank and mount to a chuck with the dovetail tenon.
- Bore the thread hole – 1 1/8″ in this case.
- Thread the hole – A Beall 1 1/4″ x 8 tpi tap
- Relieve hole 1/8 for the spindle base – on both sides. One the face so the faceplate can mount to the spindle in order to cut the relieve on the spindle side of the faceplate.
- Face off the chuck and it is ready for use.
I’ll still use metal faceplates for green bowl and large bowl turning. I like the safety of steel or aluminum in these cases.
Otherwise, I’m building my collection of faceplates.