A Woodturning Primer: Basic Sphere Process
If you happen to have technical difficulties, this video is also posted on YouTube and FaceBook. But it is best right here.
While I have demonstrated turning spheres several times both in clubs and in videos, it seems that the internet needs a refresher. It seems that way too many people think that a sphere jig is the only way to turn a perfect sphere.
I completely disagree. While a sphere jig looks neat and cuts a perfectly round sphere–mostly. It leaves a nasty tenon and still requires sanding and often, much more. Even worse, a jig does not provide fundamental skill development that can be used in many similar projects.
Therefore, I decided to shoot a new video focusing on the basic process to turn a sphere without any jig. My process uses the octagon technique to rough turn a sphere and some simple cup faceplates.
Frequently, in future videos, I will undertake additional projects the either extend or derive from a sphere.
While I explain the process in the video, there are two key factors that are important to the process:
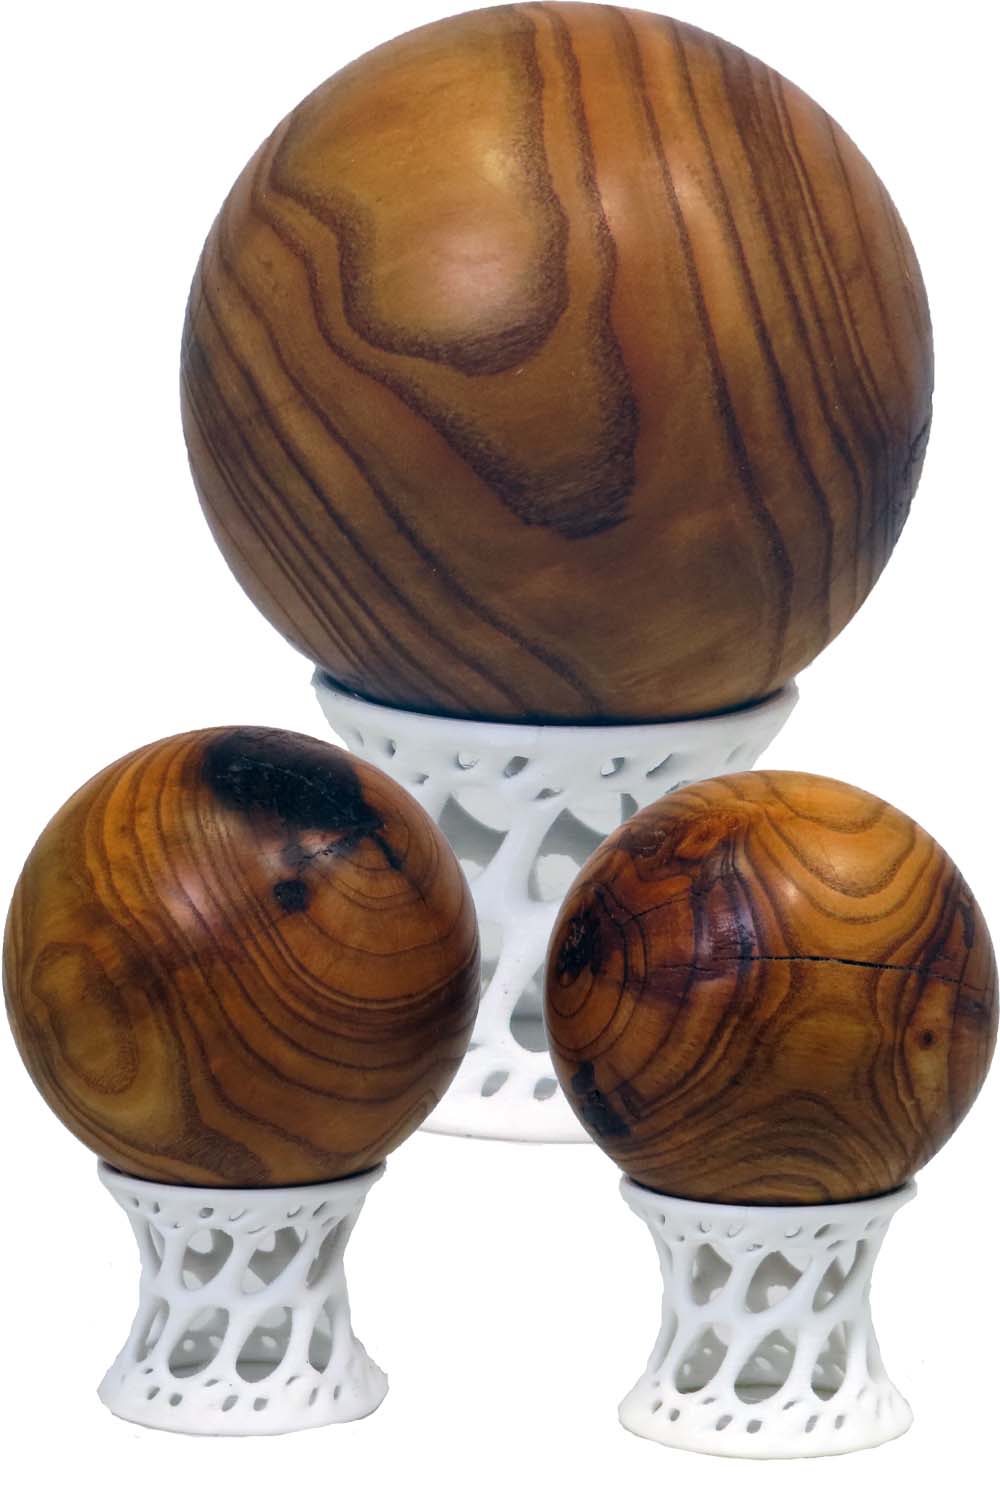
The length of an octagon’s side is 0.414 times the diameter of a cylinder containing the sphere.
Assuming the cylinder length is also equal to the diameter, the distance from the cylinder corner to the corner of an octagon is 0.293 times the diameter. Store these factors in a note on your phone – they are valuable.
This sphere is about 3 inches diameter from plum and finished with beeswax and mineral oil.
Enjoy.
p.s. Would you like a more in depth demonstration? Please contact me for an IRD (Zoom Demo) on this or other topics.
Turning Square Bottles With Laser Etch Medallions
If you happen to have technical difficulties, this video is also posted on YouTube and FaceBook. But it is best right here.

I saw a demonstration similar to this project at last summer’s AAW symposium. When I came home, I added it to my todo list. While the demonstration was excellent, I did not want to spend the time hollowing like the demonstration when my drill press can do as good a job and more quickly. The key skill for this project is to cut in from the square edge with tool control and not chipping the edge. Fortunately, this project gives plenty of opportunities to practice.
Turning the medallions is much easier when sizing templates are used. I used 1.75″ template for the outer diameter and 1.5″ template for the mounting tenon. My templates are easily 3D printed or turned from 1/4″ hardboard.
The bottle wood is apple, about 2x1x3 inches finished shellac. The medallions are hazelnut with LED laser etched mandala patterns.
Enjoy.
Safely Turning Large Square Platter
If you happen to have technical difficulties, this video is also posted on YouTube and FaceBook. But it is best right here.
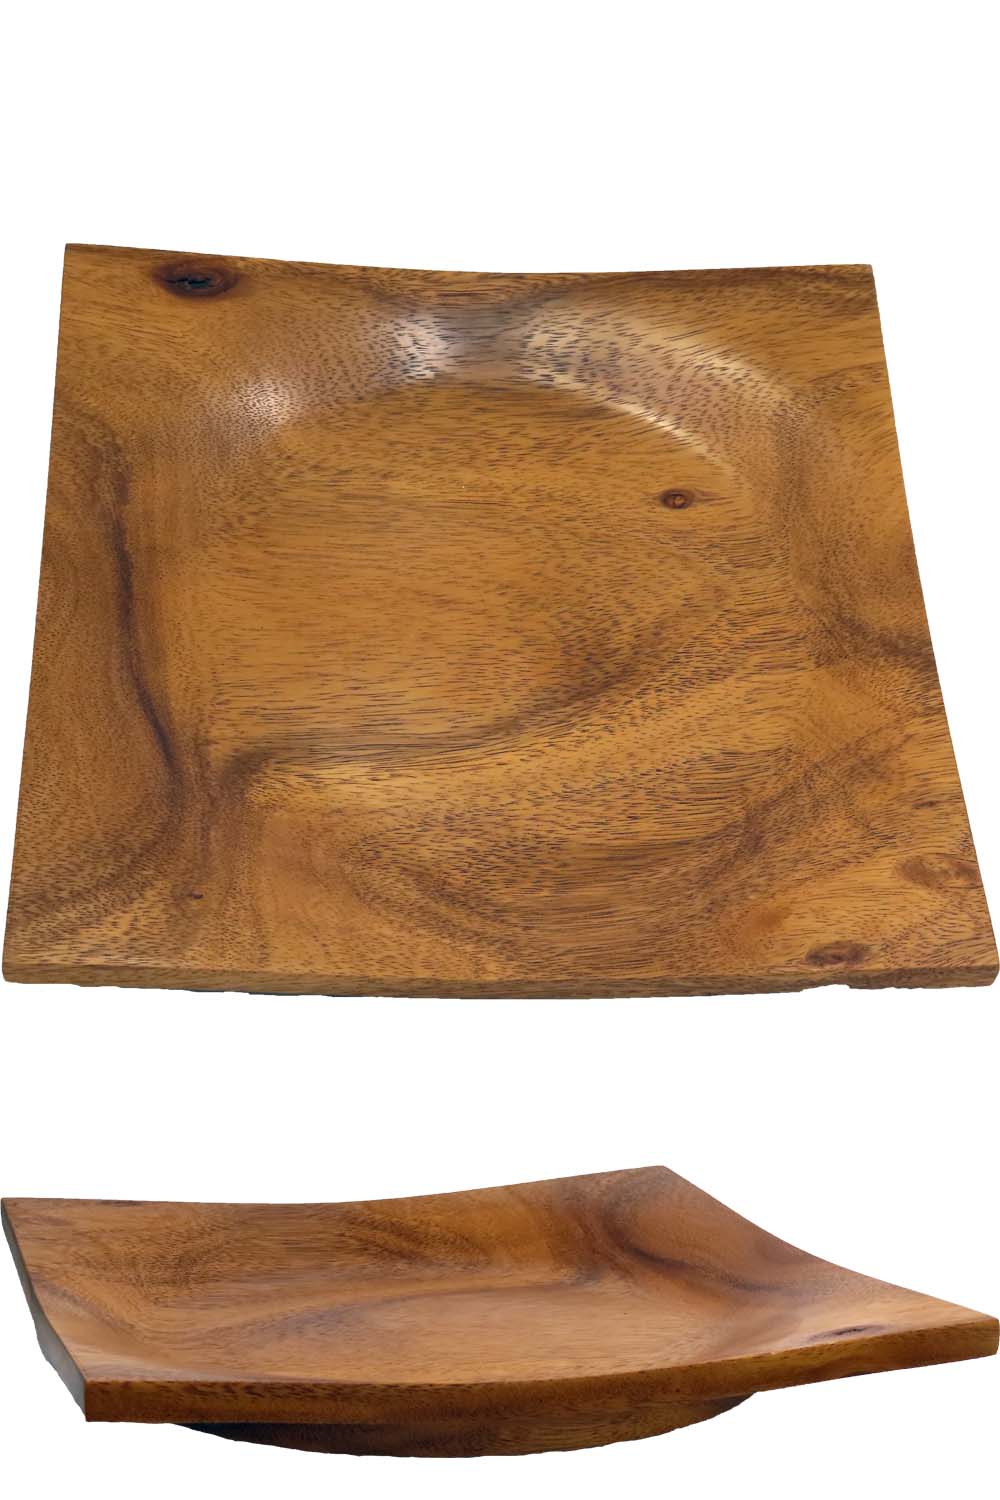
When a fellow club member moved from the area, I inherited a couple of pieces of saman wood that he had brought back from Venezuela after he lived there for a while. It is 12 by 12 inches and looks to have beautiful grain and color.
I decided to turn a square platter. Unfortunately, turning a square platter is dangerous, even more dangerous when for larger dimensions. The danger comes from the corners rotating at high speed. If the turner happens to let a finger or hand in the path of the rotation, there could be broken skin, bone, or, at least, bad bruises. In addition, leading and trailing edges are prone to chipping. For the turner, riding the gouge bevel is impossible in the corners.
My solution is to glue additional wood around the square. The plan is to turn the round platter in the extended wood blank. This leads to another problem. Once the platter is turned, remove the wood. But how? A band saw does not cut straight without jigging and leaves a rough edge. Cutting a round object on a table saw is also dangerous. Again, my plan is to screw on another board which then will serve as a guide to ride the saw fence. But, I cannot turn the platter with the board attached. Instead, unscrew the extra board and screw it again to all the added boards using the same screw holes. Then remove the board completely. After all turning is complete, reattach the guide board using the same screw holes. Using the guide, saw the opposite side; remove and re-attach to another side that is at right angles; saw again; remove the board. The freshly cut sides serve as a guide while cutting the remaining sides.
Voila, a large square platter. The big plus is that I am still intact.
The wood is saman, about 12×12 inches finished with wipe-on poly.
Enjoy.
Multi-Axis Christmas Ornament

If you happen to have technical difficulties, this video is also posted on YouTube and FaceBook. But it is best right here.
Both my clubs are participating in a Christmas themed fund raising event. The club members are contributing Christmas tree ornaments to decorate trees which will then be auctioned off for charity.
My ornament has a center body and two finials.
The body is red bud and the finials are hazelnut.
For the body, I wanted more than a traditional globe. Inspired by my recent pumpkin project, the body is a multi-axis turning with deep coves at right angles to the original turning axis.
The trick, in this case, is to ensure the coves are well spaced and at right angles to the original axis. To be well spaced, I adapted a cup chuck to have indexing marks.
To ensure the new axes are at a right angle, I drilled a 0.25 inch hole through the body before turning it into a sphere. By inserting a rod through this hole (later in the process), I could measure the distance from the rod to the headstock. Equal measures on both sides means right angles.
Since I now had a hole through the body, I needed to use a pen mandrel to rough turn the sphere. This hole also receives the finials’ tenons.
Of course, the octagon process helps to turn a perfect sphere. Just remember two measures to use the octagon process: 0.293 times diameter and 0.414 times diameter. Please see my other videos for context for these measures.
Enjoy.
p.s. Would you like a more in depth demonstration? Please contact me for an IRD (Zoom Demo) on this or other topics.
A two’Fer – Ogee Curve Platter With Bowl Funnel Salvage

If you happen to have technical difficulties, this video is also posted on YouTube and FaceBook. But it is best right here.
This project turns out to be a two’fer:
1) Our club challenge is to create a platter with an ogee curve.
2) A fellow club member created a funnel that was to join the burn pile.
Better yet, take excess wood from the ogee platter to create a second thinner platter with the same series of lathe mounts.
An ogee curve is a combo bead and cove. It is a classical form that have been pleasing eyes for centuries.
My platter is about 8″ diameter by 2″ height, walnut finished with wipe-on poly.
My second item is about 8″ diameter by 4″ height, walnut finished with wipe-on poly”
Bottom: Platter from the same wood block as the ogee platter
Middle: Failed bowl from a club member who created a funnel rather than a bowl.
Top: Smallest cored bowl.
By the way, what do you call this second item.
Enjoy.
Pumpkin Box – Combining Box, Sphere, and Multi-Axis

If you happen to have technical difficulties, this video is also posted on YouTube and FaceBook. But it is best right here.
In this video, I create a pumpkin box which combines box making, sphere turning, and multi-axis techniques.
A standard box is not difficult but does require creating a mortise and tenon joint between the base and the lid.
Turning a sphere is much easier when the octagon technique is used as the octagon provides layout measures to guide the sphere.
Multi-axis techniques create the characteristic ribs we see on a organic pumpkin.
Rolling these together does require some adjustments particularly in making the box joint.
A novice turner should view this video to set a learning target. Then, watch my other videos on turning a sphere to learn the underlying octagon technique and cup chuck techniques before coming back to turn this pumpkin.
My jar is about 3 inches diameter of ash, finished with shellac friction polish.
I demonstrated this at S.W.A.T and in IRD.
Some of my sphere videos with links:
Turn A Perfect Wood Sphere Or Ball – No Expensive Jig
Woodturning Essentials – Octagon Method For Perfect Spheres
Woodturning Perfect Spheres – For Wise Turners
Enjoy.
A Retro Glass Lid For Wood Jar In Celtic Style
If you happen to have technical difficulties, this video is also posted on YouTube and FaceBook. But it is best right here.
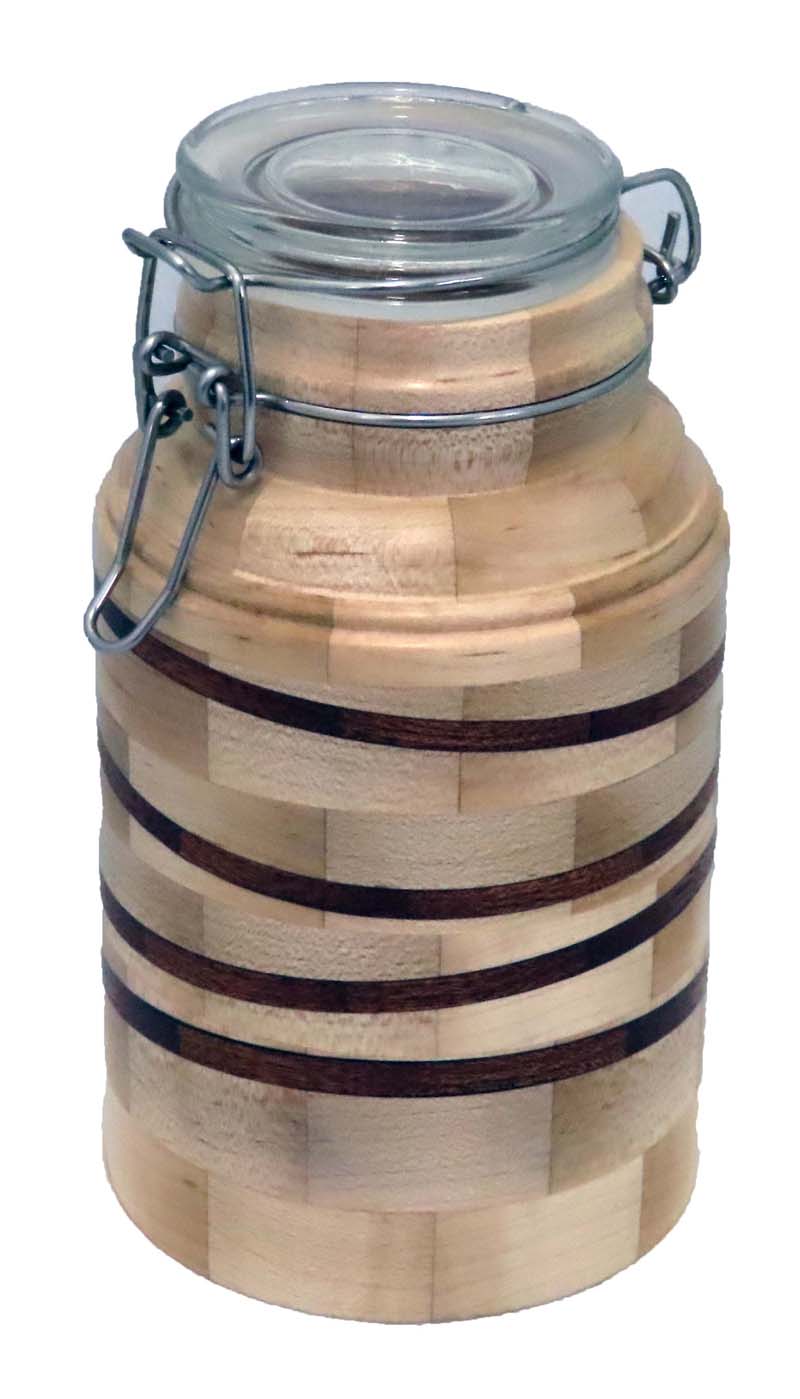
Our club had a demonstration that I had not imagined before. The demonstrator took an old fashioned glass jar with glass lid and wire clamping mechanism. Although he had acquired his jars from thrift stores, he indicated that they could also be purchased at Amazon.com.
It looked like a fun project but with technical details that could be a challenge. I decided to answer the club challenge with this project to make a jar for this retro glass ring. However, I decided to make my jar segmented. To enhance it further, I decided to add four Celtic style rings for visual interest.
These rings follow my three rules for Celtic knots.
- Accurate sawing for height, angle, and rotation.
- Exactly replace wood removed.
- Accurate position and align both pieces while inserting the slice.
My jar is 3.5 inches diameter and 6 inches tall. The base wood is maple. The accent wood is a mystery to me.
Enjoy.
My First Bowl From A Board

Creating a bowl from a board has been on my hit list for quite a while. Fortunately, an excellent club demonstration and challenge brought it to the top of the list.
It also breaks my silence. I haven’t posted a video for a while due to many conflicting priorities. Those are being resolved.
Out club demonstration included many options. I have selected the one that fits me the best and brings out the beauty of the wood and the technique.
The bowl is about 10 inches diameter and 5 inches high. All finished with wipe on poly.
Enjoy.
2024 Christmas Ornament Challenge – Best of the Best
The votes are in – We now know which ornament are most popular. However, I am amazed at the variety and talent showing the all the different ornaments.
The challenge welcomes ornaments of all sorts, any craft, any media, any tradition. At least, these are the predominate ones. By the way, collaboration is also great.
There were 344 ornaments submitted from 184 different people.
Our sponsors were:
Craft Supplies USA
Hunter Tool
Chefware Kits
Turn Tex
Robust
Woodturners Wonders
Carter and Son
Niles Bottle Stoppers
As Wood Turns
Please thank them for providing additional spice to the challenge.
Finalist from the voting were:
67 Brad Hildenbrand Tight fit
85 Jack Boggio Santa’s Toy Shop – R&D
77 Robert Vogtman Chevron Sphere – Bloodwood & Maple
290 Howard Stenger Snowman Globe
33 David Arruda Mr. Peanut Decked Out For Christmas
205 Jose E. Cruz Rocking Horse
79 Robert Vogtman Spring Spiral – Maple, Bloodwood, Walnut
3 James Norfleet Sitting Penguin
337 Anibal Ruiz Gnomes under the rain
333 Holden Tranquillo Tree Chimes
294 Michael Weisend Twist
124 Dave Volzer Christmas Angel
2 Shelly & Jim Kent Santa’s Reindeer Flight School Candy Jar
28 Dale Guilford Piercing Snow
24 Louis Currier Adrift
In addition, the hosts selected many more for recognition.
Clubs winning a free IRD (remote demonstration) were:
Cape Cod Woodturners
Woodworkers of Central New York
Asociacion Torneros de Madera de Puerto Rico
Coming closely behind were:
Arizona Woodturners Association
Detroit Area Woodturners
Enjoy.
Inspiration Arising From Club Gift Exchange

My shop is inaccessible due to remodeling and expansion.
This was compounded by the framer who did not plan on a day of rain. Drywall on one wall of our home including my shop got soaked. We’ve had to remove it. Replacing it is messy business.
However, our club, Timpanogos Woodturners, had a gift exchange. I found the gifts inspirational and took pictures.
I thought they were worth sharing. Sorry, I did not capture artist names and further details.
Enjoy.