Woodturning Bark Edge Candlestick From Crooked Branch
 This video is also posted on YouTube, Vimeo, and FaceBook. Best Right Here Already!
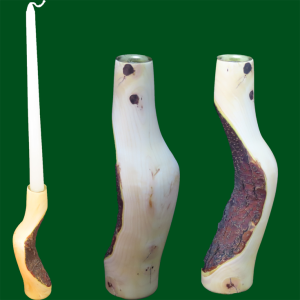
This project is a crooked branch I cut from a crab apple tree. I’ve been watching out for such a limb following a demonstration by Paul Russell at our club meeting.
It is kind of like a multi-axis turning because the crook in the branch provides the alternate axes. It is definitely a lathe-shaker due to the off center weight distribution.
My candlestick is about 9 inches tall without the candle. The finish is walnut oil.
It is unique.
Enjoy!
Christmas Ornament Challenge 2019 Viewer Vote
Here are the ornaments in the 2019 Christmas Ornament Challenge ready for viewer voting
This is the opportunity for viewers to pick their favorites. Please express your favorites in high to low order separated by commas such as 1,2,3,4,5.
Enter your picks in a single comment by December 15, 2019. Multiple comments from the same person will not be tabulated.
We’ll announce the winners in another video.
Enjoy and VOTE!
If you’d like to see the ornaments in a web page, go to the Challenges page in this website.
Classy, Easy, DIY Christmas Ornament Hangers
I like to make my own wire hangers for my Christmas ornaments. In my view, they are a much better alternative to screw eyelets.
Materials
- Copper wire (silvered, copper, black, etc) 18 to 24 gauge available from craft stores and some hardware stores.
- Drill bit or transfer punch – size to taste
- Jacobs chuck or other way to hold bit.
- Wire cutters
- Pliers
- CA glue for attaching to ornament
Wrap wire around drill bit and twist the ends together for a tight weave.
Enjoy!
Woodturning Segmented Christmas Ornament
 This video is also posted on YouTube, Vimeo, and FaceBook. But you’re already here!
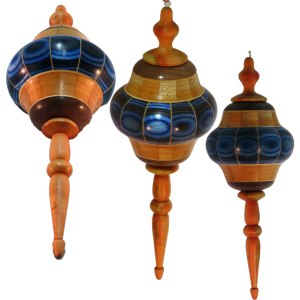
I received some colored laminated wood from Frog Blanks to try out. This is my second attempt to use the samples both in a Christmas Ornament. After all the 2019 Christmas Ornament Challenge is open for submissions until November 30.
My key to using this wood well for a Christmas ornament is for a segmented ornament. It is critical to rotate the wood so that the plys are running vertically before cutting segments.
This ornament is about 2″ diameter and 6 inches long. I used a blue Frogwood and cherry for segments plus maple veneer, walnut, and spalted box elder. 56 total pieces of wood.
Please get your ornament ready for this year’s the Christmas Ornament Challenge. It does not have to be fancy or perfect – this bell is neither fancy or perfect. However, it is a nice addition to the Christmas Ornament Challenge.
To enter the challenge, please go to the Challenge Page.
Enjoy!
This Christmas Ornament Is Not A Sea Urchin
 This video is also posted on YouTube, Vimeo, and FaceBook. Best right here where you are!
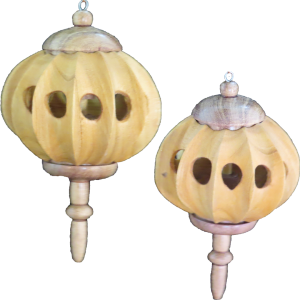
After turning the “Ribbed and Holey” form recently, I received several suggestions that it could be a Christmas Ornament. And, the Christmas Ornament Challenge is open right now.
So, I thought how to scale the down to a size appropriate for a Christmas ornament. There were some challenges. But, I think it succeeded.
Remember, the Christmas Ornament Challenge. Please get your ornament ready for this year’s challenge. It does not have to be fancy or perfect – this bell is neither fancy or perfect. However, it is a nice addition to the Christmas Ornament Challenge.
To enter the challenge, please go to http://www.AsWoodTurns.com/Challenges
Enjoy!
This Pruned Limb Did Not Go to The Dump
 This video is also posted to YouTube, Vimeo, and FaceBook. Where best – Right Here of course!
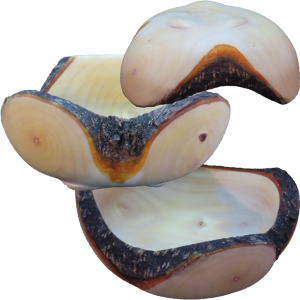
While I was doing some fall pruning, I cut a small to medium limb off of a crab apple tree. As I prepared the wood to go into the garbage bin, the limb presented itself. Exactly how, I do not know.
But I realized although this was only a limb, perhaps I could turn some smaller projects from it. One crotch caught my eye since the wider area could yield a larger bowl than otherwise.
So I took the limb into the shop and turned this small bowl only about three inches in diameter.
Remember, the Christmas Ornament Challenge. Please get your ornament ready for this year’s challenge. It does not have to be fancy or perfect – this bell is neither fancy or perfect. However, it is a nice addition to the Christmas Ornament Challenge.
To enter the challenge, please go to the Challenges page.
Enjoy!
Multi Axis Woodturning – Ribbed and Holey
 This video is also posted to YouTube, and Vimeo. Best Right Here!
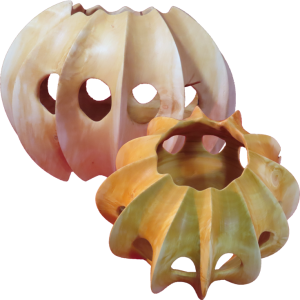
This project is my third where I am emulating Max Brosi after seeing his demonstrations at the the AAW symposium last summer in Raleigh, North Carolina. The other projects were his octahedron and his whale bone. Each of the three projects starts with a sphere, something that I’ve demonstrated many times. It was interesting to hear someone else explain it a little differently.
After turning a sphere, I had to mark for and cut 12 coves around the sphere. After the coves are cut, then I hollowed the sphere through the ends and allowed the hollowing to break through the lower middle section of the coves. Then clean up with carving tools.
Other than turning an interesting project, I appreciate the many great ideas that flowed from completing these turnings.
This is ornamental pear, very wet when I started. It is now finished with walnut oil.
Remember, the Christmas Ornament Challenge. Please get your ornament ready for this year’s challenge. It does not have to be fancy or perfect – this bell is neither fancy or perfect. However, it is a nice addition to the Christmas Ornament Challenge.
To enter the challenge, please go to http://www.AsWoodTurns.com/Challenges
Enjoy!
Woodturning Mesquite Bowl – Back To Basics
 This video is also posted on YouTube, Vimeo, and FaceBook. But, you are already here.
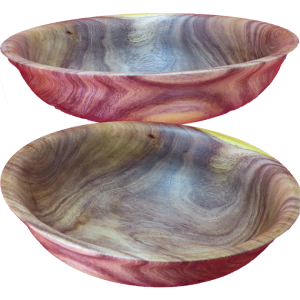
Oh how I love to green turn a wood bowl. This is what attracted me to woodturning in the first place – I wanted to turn wood bowls. Other turning projects are great and interesting but I still love turning bowls.
This wood is green or wet mesquite. Since I wanted this to be perfectly round, without any warp, I used a two step process.
First, rough turn the bowl.
- Mount the blank. Options include between centers, screw chuck, and pressing against a faceplate. I rarely screw a faceplate to the wood anymore.
- Get the wood round. This is the hardest turning since the blank is unbalanced. I don’t try to precisely cut a blank round because it limits where I can place the centers and I risk cutting away wood with a band saw that I would want later with the bowl.
- Form the exterior in whatever shape I see inside the wood. Critical features here are a mounting tenon; a clearly marked center usually from the live center but cut in if necessary; and a secondary ledge that visually helps me form the curve of the bowl excluding the tenon.
- Reverse the bowl onto the tenon and hollow ther interior leaving the walls uniform but about 1″ thick for this size bowl. (about an inch per 10 inches of diameter)
- Dry the bowl. I like to seal the bowl but this is optional. I’ve also used shavings, a paper bag amoung other techniques to moderate the speed of drying. I want the wood to dry uniformly through its thickness. If the surface wood dries too quickly, a crack is guaranteed. Still cracks are a risk.
Second, refine the bowl.
- Press the bowl against a faceplate sized to its exterior diameter or at least to its interior diameter. Either works. Refine the tenon and the exterior bottom.
- Mount the bowl into its refined tenon. Refine the exterior and again hollow the interior to its final shape.
- Refine the foot. There are many options to refine the foot: carving, jam chucks, or in this case using Cole jaws on a chuck to hold the bowl while the foot is refined.
- Sand. I always start sanding a medium to large with no greater than 80 grit. Then progress up through the grits. The first grit removes any final ridges, grooves, and other defects(if possible). Subsequent grits only remove scratches from the previous grit. It is false economy to start sanding with too fine grit sandpaper.
- Finish
The Christmas Ornament Challenge will open November 1. Please get your ornament ready for this year’s challenge. It does not have to be fancy or perfect – this bell is neither fancy or perfect. However, it is a nice addition to the Christmas Ornament Challenge.
To enter the challenge, please go to http://www.AsWoodTurns.com/Challenges
Enjoy!
Woodturning Experimental Segmented Christmas Ornament
 This video is also posted on YouTube, Vimeo and FaceBook. Where Best? – Right Here!
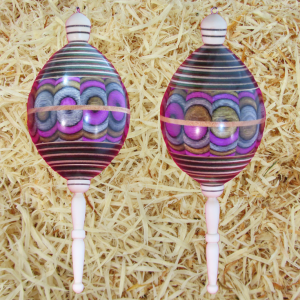
This is the first time I’m using type of wood. It comes from FrogBlanks.com. It consists of birch veneers that may be dyed, then laminated in one directly only. (It is NOT cross banded). This is pretty wood.
However, I generally do not use plywood for turning projects. This, is different, because there are no voids and no cross banding. Therefore, the wood is uniform. Cross banding is not necessary due to the quality of veneer incorporated.
But, even colored wood could be fairly plain and not the look that I wanted. However, if the blank is cut and turned 90 degrees, it could yield a very pretty pattern.
Other woods used are hazelnut for the finials, maple veneer for accents, and honey locust for the center dividing band.
Please get your ornament ready for this year’s challenge. It does not have to be fancy or perfect. However, I will add it to the Christmas Ornament Challenge.
To enter the challenge, please go to http://www.AsWoodTurns.com/Challenges
Enjoy!
Woodturning Mixed Laminated Christmas Bell Ornament
 This video is also posted on YouTube, Vimeo, and FaceBook. Where Best? Right Here Already!
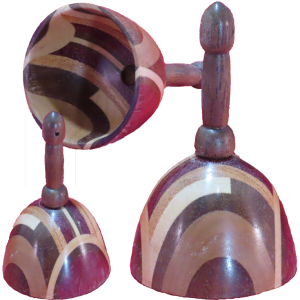
This is my first ornament for this year’s Christmas Ornament Challenge. It is a variety of woods from a past laminated project. One nice thing about Christmas ornaments is that scrap wood is a great source of perfect material.
This project turned out to be a bell. But, it did not start out that way. At a critical point in the process the project concept took a sudden turn and it because a Christmas bell.
Please get your ornament ready for this year’s challenge. It does not have to be fancy or perfect – this bell is neither fancy or perfect. However, it is a nice addition to the Christmas Ornament Challenge.
To enter the challenge, please go to the Challenges page.
Enjoy!